How to play DREMDAR
Everything that matters about the game in plain words — from your first fight to clans and the tournament. The numbers on the pictures match the notes below them.
01Getting started
DREMDAR is a turn-based fighting game with character progression, set in a dark fantasy world. You are a fighter who has come to the only city at the crossroads. Beyond its walls lie the Wildlands: forest, river and mines crawling with beasts. Beat them, collect gear, level up — and then step into the Arena against real people.
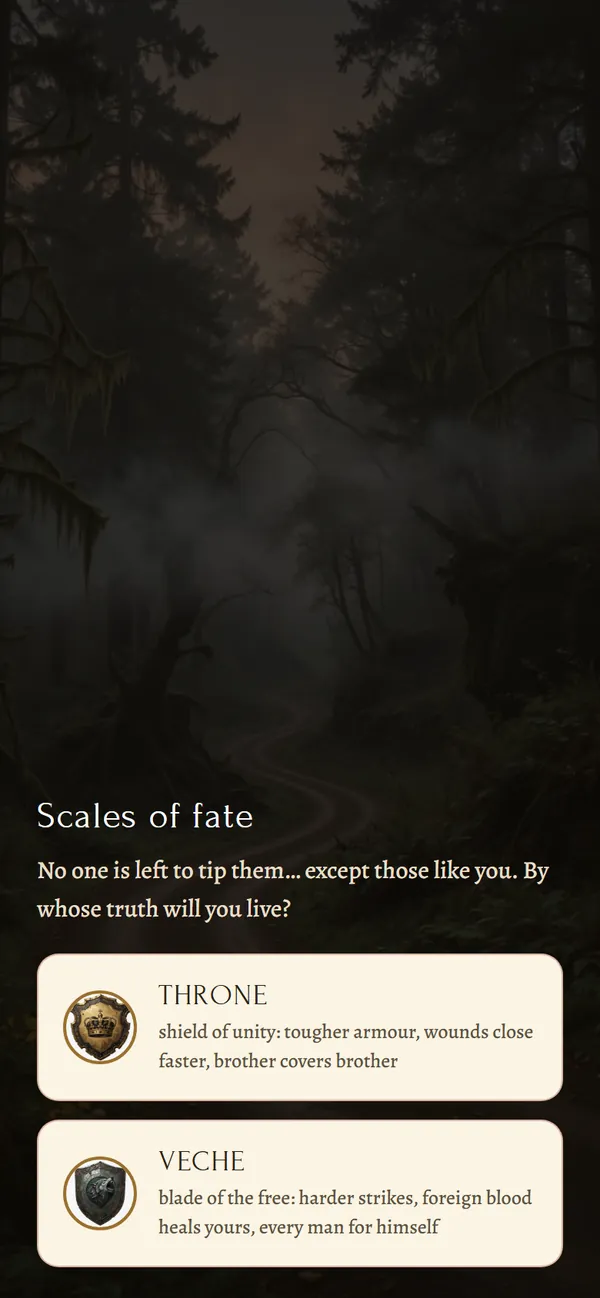
After you sign up, the game asks you to pick a side. Throne or Veche is your truth and a mark next to your name, not a class. Your side doesn't change your strength, and you can switch it only once. Then you pick your avatar. It's only your look: who you become is decided by the points you put into your attributes.
From there the game leads the way. Your first fight starts right from the City, then hints show you the way to the Thicket, your first loot and the Shop. At the top of the City there's always a “Next step” card with your nearest quest: tap “Go” and the game takes you to the right place, and finished quests pay out crystals.
What unlocks as you grow:
- at level 3, ambushes begin in the Wildlands;
- at level 5, Arena fights and the first boss lair open up;
- at level 10 — the world boss, your first skill (Healer, Alchemist or Weaponsmith), artifacts and injuries;
- at level 20 — the Menagerie with companions and your second skill;
- at level 21 — the Depths, where beasts are tougher and rewards richer;
- at level 30 — your third skill.
02City
The City is your home and a safe zone. No one can attack you here, and your health recovers in peace.
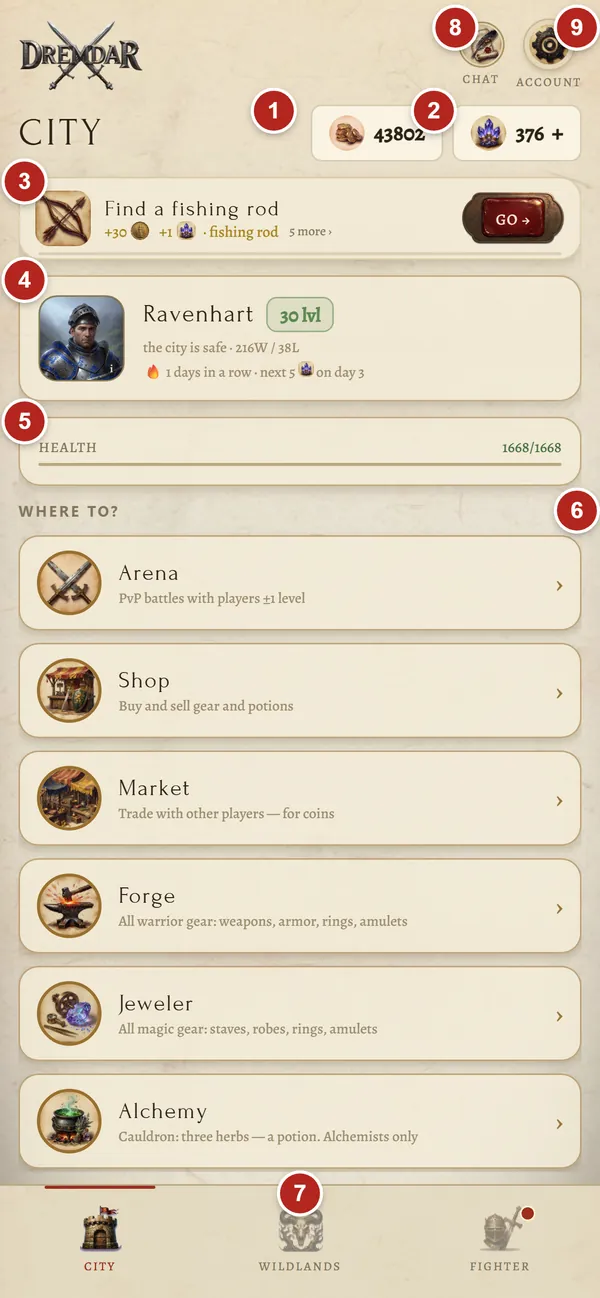
- 1Coins — the main currency: you spend them on gear, potions and tempering.
- 2Crystals — the rare currency. The plus next to them opens the crystal shop and quests.
- 3Next step — your nearest quest or hint: equip a stronger item, replace an outdated weapon.
- 4Your banner: avatar, level, wins and losses, daily login streak.
- 5Health. If it isn't full, a timer next to it counts down until it is.
- 6Where to? — all the places in the City.
- 7Bottom tabs: City, Wildlands and Fighter.
- 8Chat.
- 9Account: settings, language, theme, game guide.
Places in the City:
- Arena — fights against real players and the weekly tournament;
- Shop — buy and sell gear, potions, scrolls, artifacts, tools;
- Market — trading between players for coins;
- Forge — tempering and reforging warrior gear;
- Jeweler — the same for magical items, only here it's called cutting;
- Alchemy and Weaponsmith — skill workshops; they appear once you pick the skill;
- Menagerie — companions;
- Clan & Throne — clans, treasury, wars and castles;
- Fighter — your character and gear.
03Fighter: attributes and stats
The “Fighter” tab is all about your character. This is where you spend points, put on items and see what you're worth.
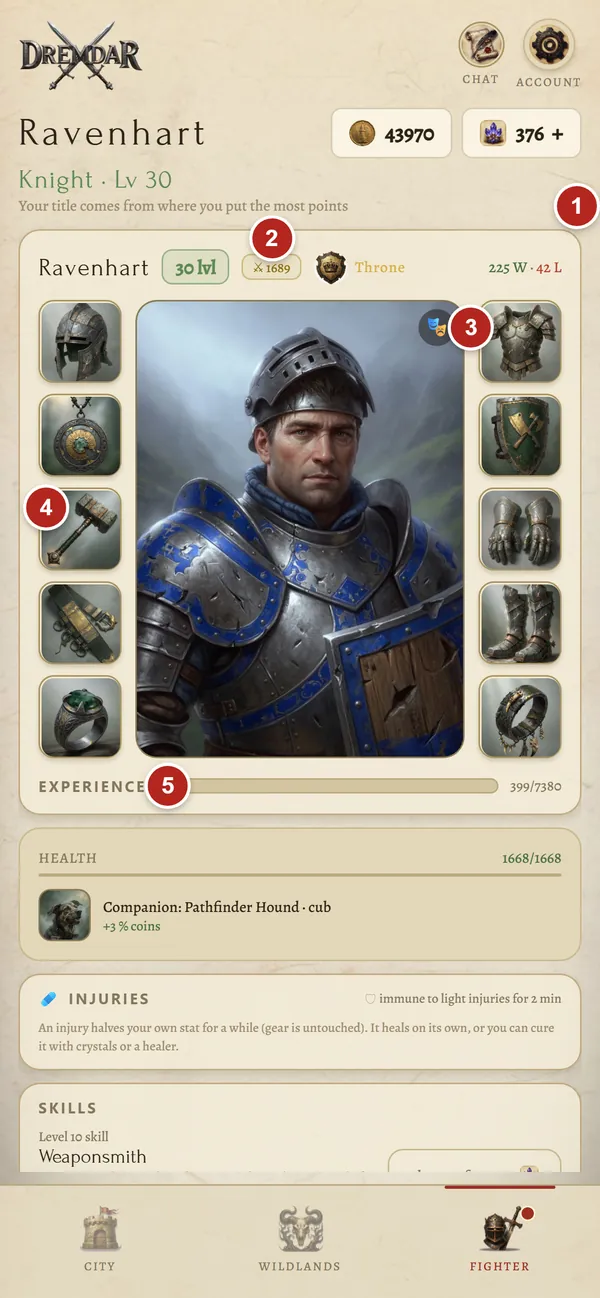
- 1Title. It depends on where you've put the most points: Strongman, Duelist, Knight, Berserker and others. It's only a title and gives no bonuses.
- 2The number with swords — your fighter's overall power. Arena opponents are matched by it.
- 3Change avatar.
- 4Equipped items: on the left helmet, amulet, weapon, belt and ring; on the right armor, shield, gloves, boots and the second ring. Tap an item to open its card.
- 5XP to the next level.
Five attributes
Every new level gives you 3 points. You spend them with the “+” button, instantly and for good, until you do a reset.
- Strength — you hit harder. The main attribute for those who fight with weapons.
- Agility — you dodge blows more often and add a little damage. Your opponent's Agility, on the other hand, makes it harder for you to dodge.
- Luck — you land critical hits more often, and the crit itself hurts more.
- Health — a bigger health pool.
- Knowledge — spell power and mana. Without Knowledge you can't cast.
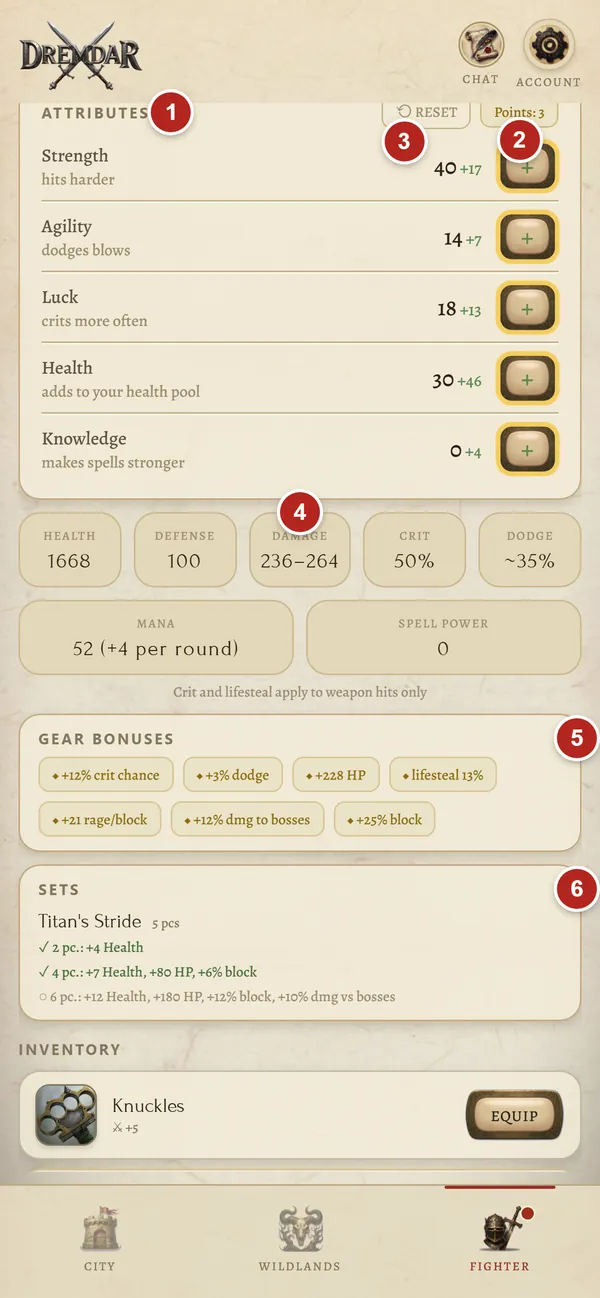
- 1Attributes: first the value you've put in yourself, in green — the bonus from items.
- 2Free points. While you have some, the “+” buttons blink.
- 3Reset: all your spent points come back, and you can distribute them again.
- 4Final stats: health, defense (the armor of all your items), damage of a single strike, crit chance and dodge. Below them, if you have Knowledge, — mana and spell power.
- 5Gear bonuses: everything special your equipped items give you.
- 6Sets: how many pieces of a set you're wearing and which bonuses are already active.
What the stats mean:
- Health — how many blows you can take.
- Defense — armor. It cuts damage from weapon strikes, but never takes off more than half of a blow. Spells fly right past armor.
- Damage — how hard your strike hits without crit and rage. A strike to the head hurts more than one to the legs.
- Crit — the chance of a critical hit. Crit has a cap, so pumping only Luck forever won't work.
- Dodge — a rough chance to evade a strike to an uncovered zone. It's lower against an agile opponent.
Attribute reset is free and unlimited until level 10. After that the first reset is free too, while the next ones cost coins or crystals, and frequent resets get pricier. After a reset, items you no longer have the attributes for are taken off.
04Combat
Combat is turn-based, and each turn you make two choices: where to strike and what to cover. Meanwhile your opponent decides the same, and the round is resolved for both of you at once.
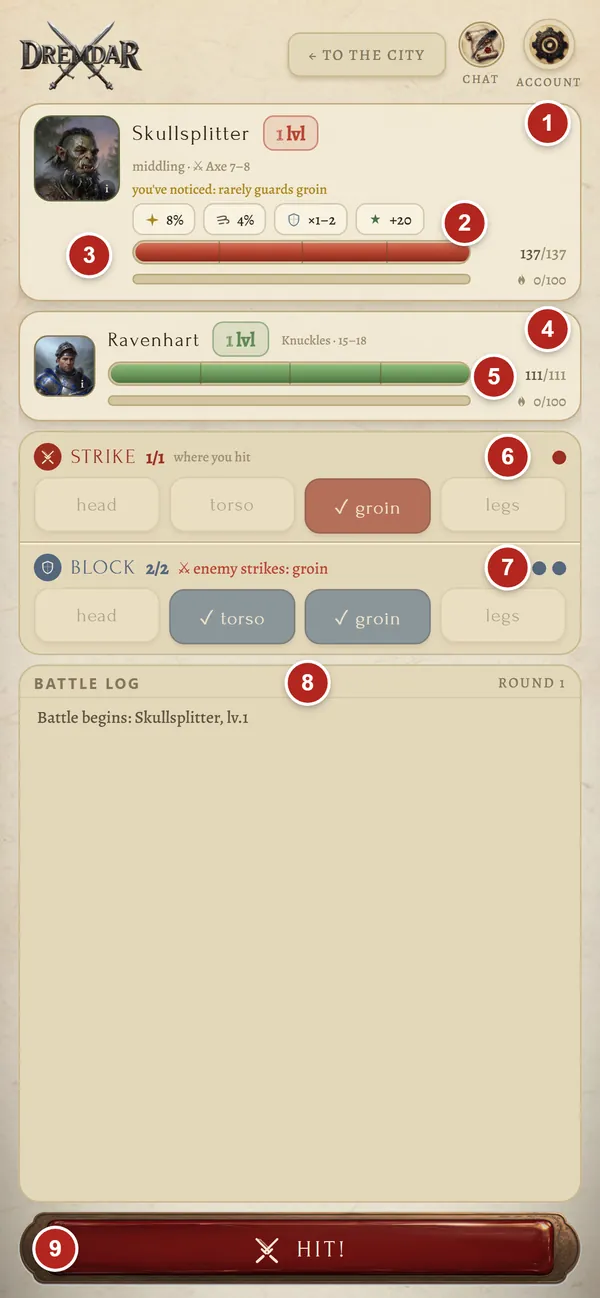
- 1Your opponent: name, level, weapon and a hint about which zone they cover less often than others. Tap the portrait to open their detailed card.
- 2Their crit chance, dodge, how many zones they cover and how much XP you'll get for the win.
- 3Your opponent's health and rage.
- 4You.
- 5Your health and rage. If you've put points into Knowledge, mana appears below as well.
- 6Strike: pick one zone out of four — head, torso, groin or legs.
- 7Block: pick what to cover. In your first five fights the game shows where the enemy will strike.
- 8Battle log: who hit where, how much damage, who dodged.
- 9The move button. It lights up once you've picked a strike and a block.
Strike, block and rage
- Block fully cancels a strike to a covered zone. You usually cover two zones, or three with a shield.
- Crit punches through a block, but only by half.
- Dodge only saves you from a strike to an uncovered zone.
- Rage builds up when your block cancels a strike, and in the Arena also from spells that hit you. If you cover one zone instead of two, rage grows twice as fast and dodging gets easier too, but you take a bigger risk. When the bar is full, “×1.6” appears by the “Strike” button: tap it, and this turn's strike will be more than one and a half times stronger.
- A strike to the head hurts the most, a strike to the legs the least.
Your weapon matters a lot
- One-handed weapons hit steadily and pair perfectly with a shield.
- Two-handed weapons hit hard: even against a covered zone, a third of the damage goes through the block.
- Paired blades strike twice per turn at two different zones, each hit weaker. In the Shop their damage is shown per turn right away.
- Staves and wands are a mage's weapons; they boost spells.
- A shield gives you a third block zone.
Magic
A spell is cast instead of a strike, and you set your blocks as usual. Magic flies past block, dodge and armor, which makes a mage dangerous to any plate-clad fighter. Mana is full at the start of a fight and comes back a little every round. Out of mana — you hit with your weapon. New spells unlock as you level up: the first one right away, the next ones every few levels, if you've put points into Knowledge. Crits, lifesteal and rage work only for weapon strikes.
Potions and scrolls in combat
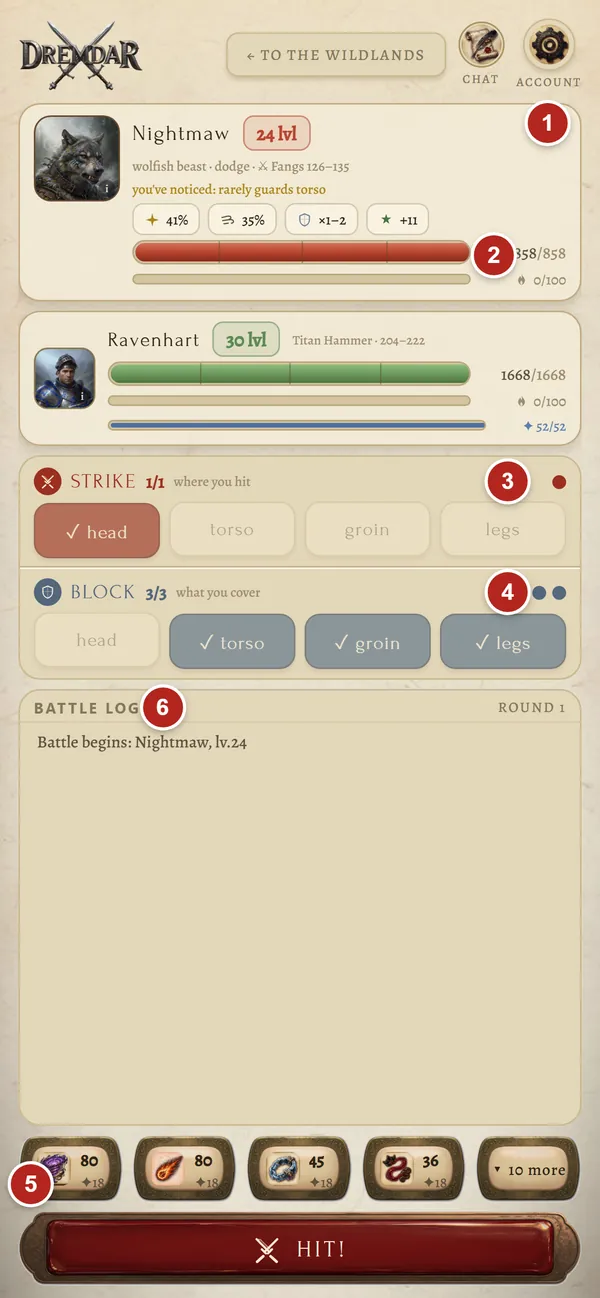
- 1Opponent.
- 2Their health and rage.
- 3Strike.
- 4Block: with a shield you can cover three zones.
- 5Spells, potions and scrolls. Everything else is hidden behind the “more” button.
- 6Battle log.
- You drink a potion along with your strike, and it doesn't cost you the turn. In one turn you can drink one potion or read one scroll.
- A healing potion heals you before the round's blows land. You can't drink it at full health.
- The Scroll of Healing restores all your health, but only once per fight. The Scrolls of Stone Skin and Might last until the end of the fight.
- The Scroll of Second Chance is charged with a button in combat: if you get killed, you get back up with part of your health. It works once per fight, in the Arena too.
Beast habits
Every kind of beast has a zone it covers less often than others. The hint “you've noticed: rarely guards …” is shown right under the enemy's name — strike there. After a defeat the game will also break the fight down for you: where the enemy struck most often and what it rarely covered.
End of the fight
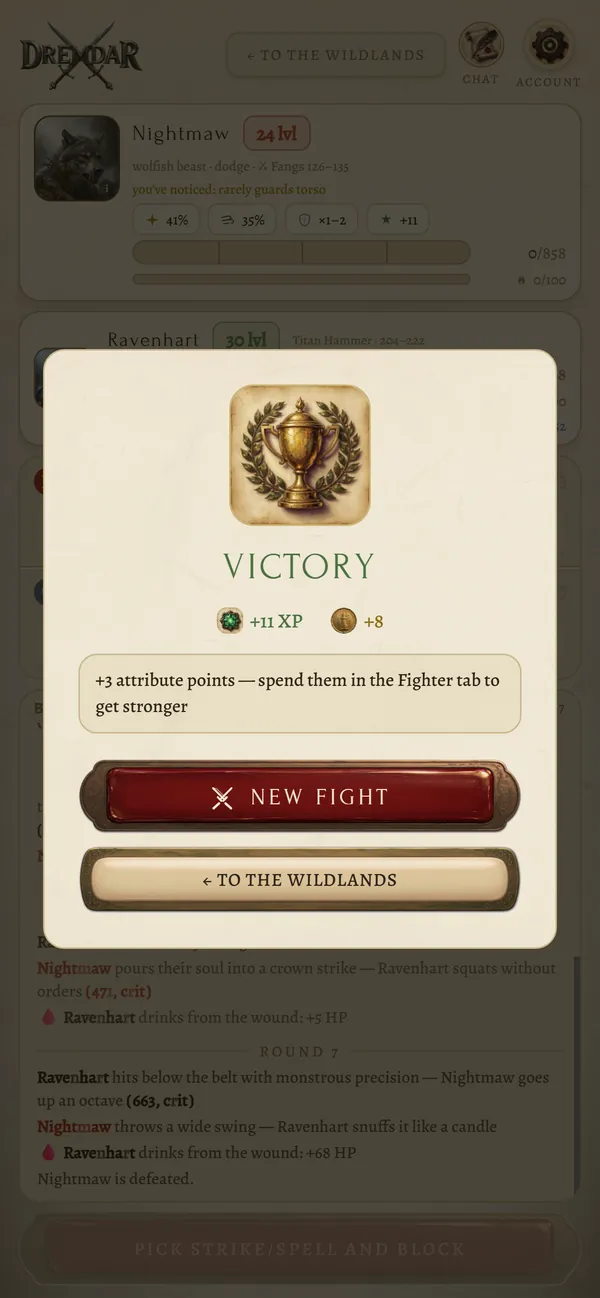
- Victory brings XP, coins, and sometimes an item or materials.
- Defeat gives a little XP if you managed to wound the enemy, but no coins, and afterwards your health takes longer to recover.
- If your health is low, the main button is “Rest”: it sends you to the City.
- In a fight with a beast there's no turn timer, so you can take your time. Closed the game mid-fight — the fight will wait. You can leave without fighting only before the first blow, and if you start a new fight while an old one is abandoned, the old one counts as a defeat.
- In the Arena you get one minute per turn. No move — you lose.
05Health, rest and injuries
Health recovers on its own: within a few minutes after a victory, a bit longer after a defeat. The Potion of Fearlessness speeds this up, and the Scroll of Stitched Wounds instantly restores half your health.
- The City is safe: no ambushes, and no Scroll of Assault can reach you there.
- The Wildlands are dangerous: an ambush can happen at any moment. If your health is low, head back to the City.
- If you're about to fight with low health, the game asks: rest, go with a potion, or fight anyway.
Injuries
From level 10 there are injuries. You get one if you die from a critical hit: from another player, from a boss, and from level 20 also from beasts. If you've far outgrown a lair boss, you can get a light injury from its critical hit right in the fight. An injury temporarily weakens one, two or three of your attributes, depending on how severe it is. An injury doesn't touch your health.
- After an injury you get a short immunity: you won't get an injury of the same or lighter severity right away. You can never have more than three injuries at once.
- You can cure it for crystals in the Injuries block on the “Fighter” screen, for coins from a player Healer, or just wait it out.
- Other players can see your injuries. A wounded rival is easy prey, so think twice before stepping into the Arena.
- The Scroll of Stone Will protects you from any injuries for a few hours, and the Alchemist's balm from light ones.
06Wildlands
The Wildlands are the untamed lands beyond the walls. Here you'll find the Thicket with its beasts, boss lairs, the Depths, professions and the world boss.
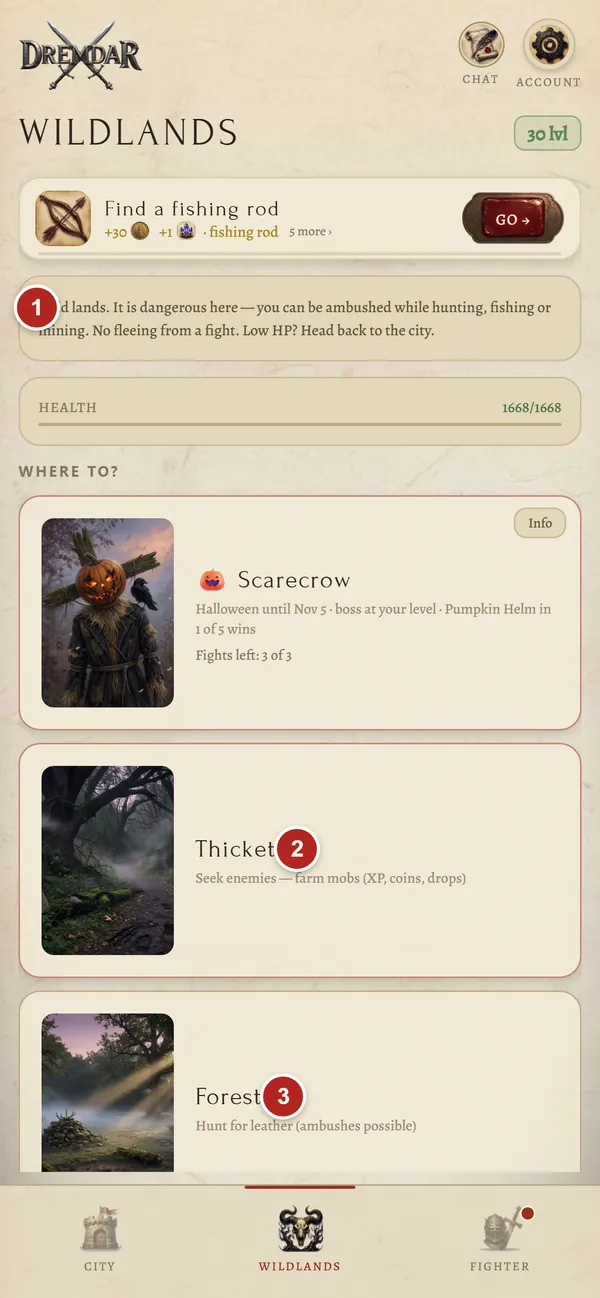
- 1It's dangerous here: you can be attacked while hunting, fishing or in the mine, and there's no escaping an ambush.
- 2Thicket — fights with beasts matched to your level: XP, coins and loot.
- 3Forest, River and Mine — professions.
Thicket
Six kinds of beasts live in the Thicket, and each time you meet a random one. A goblin is a bit weaker than you and pays less; an ogre or a troll is a bit stronger and pays more. Tap “New fight” after a win and a new random beast comes out. Thicket beasts grow along with you only up to a certain level. Once you've outgrown them, the rewards drop, and it's time to head into the Depths.
Lairs and bosses
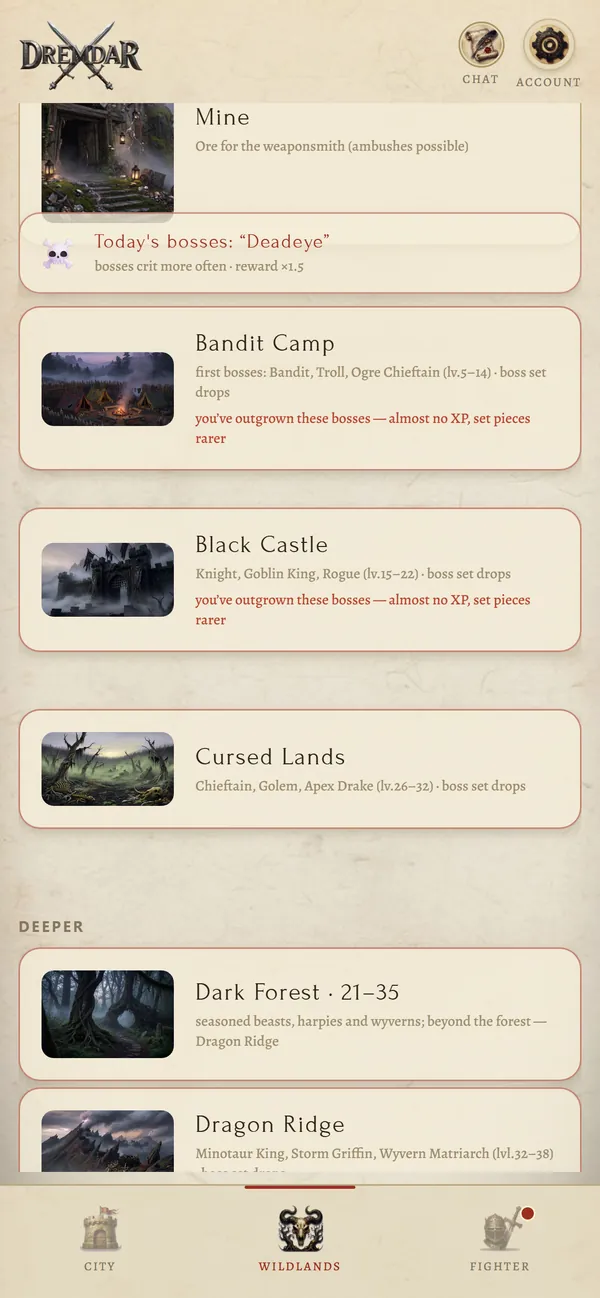
Lairs open up as you level. Bosses live inside, and each one has its own set of items that drops only from it. A boss's level is fixed; it doesn't adjust to you. Enter a lair and a boss comes out on its own — one you can handle.
- Keys: each boss can be beaten 3 times a day. A defeat doesn't use up a key. Out of keys — buy more for crystals or come back tomorrow.
- Boss of the day: every day all bosses get a special trait, like hitting harder or dodging more often. But the reward for them is higher too, and on weekends set pieces drop twice as often.
- A wounded boss flies into a rage and hits harder.
- If you've outgrown a boss, there'll be almost no reward. Find a lair that suits your level.
Depths
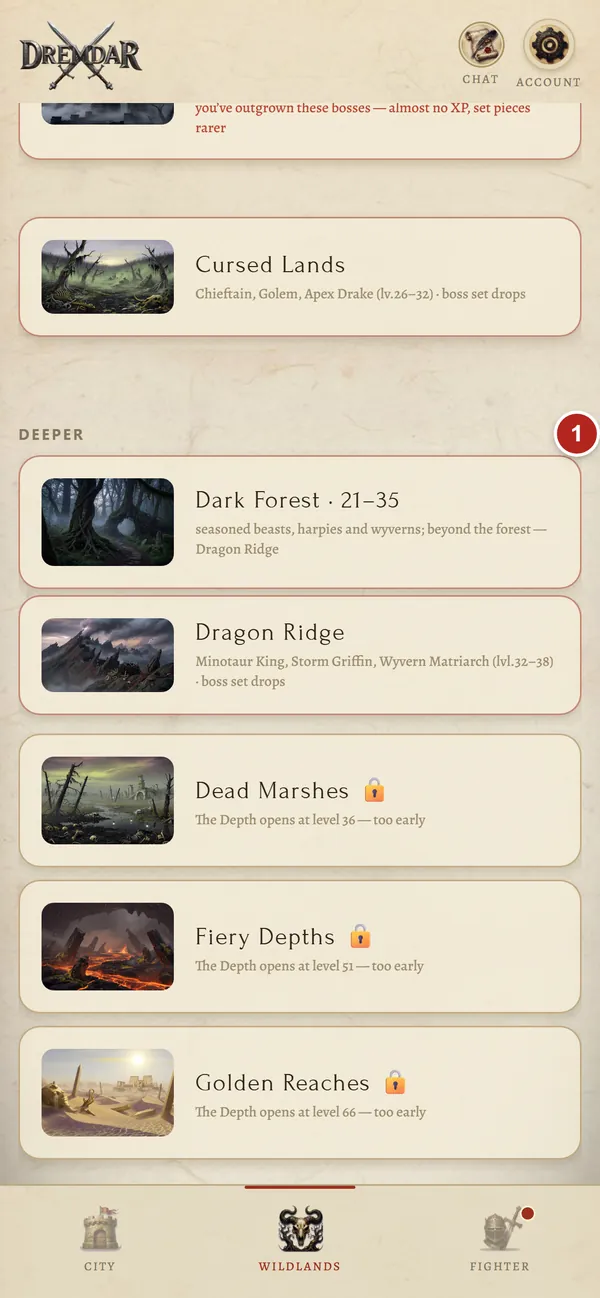
- 1Deeper: lands with their own beasts and lairs.
Dark Forest, Dead Marshes, Fiery Depths and Golden Reaches — each Depth is more dangerous than the one before. The beasts there are stronger, craftier and pay more generously, and every Depth has its own lair.
Ambushes
From level 3 you can be attacked in the Wildlands: while you're standing in the Wildlands, on the road, at a profession or in the middle of a hunt in the Thicket. There's no running from an ambush. If you fight for a long time without a break, ambushes come more often and the beasts in them get nastier. Take a couple of minutes' rest, and things calm down.
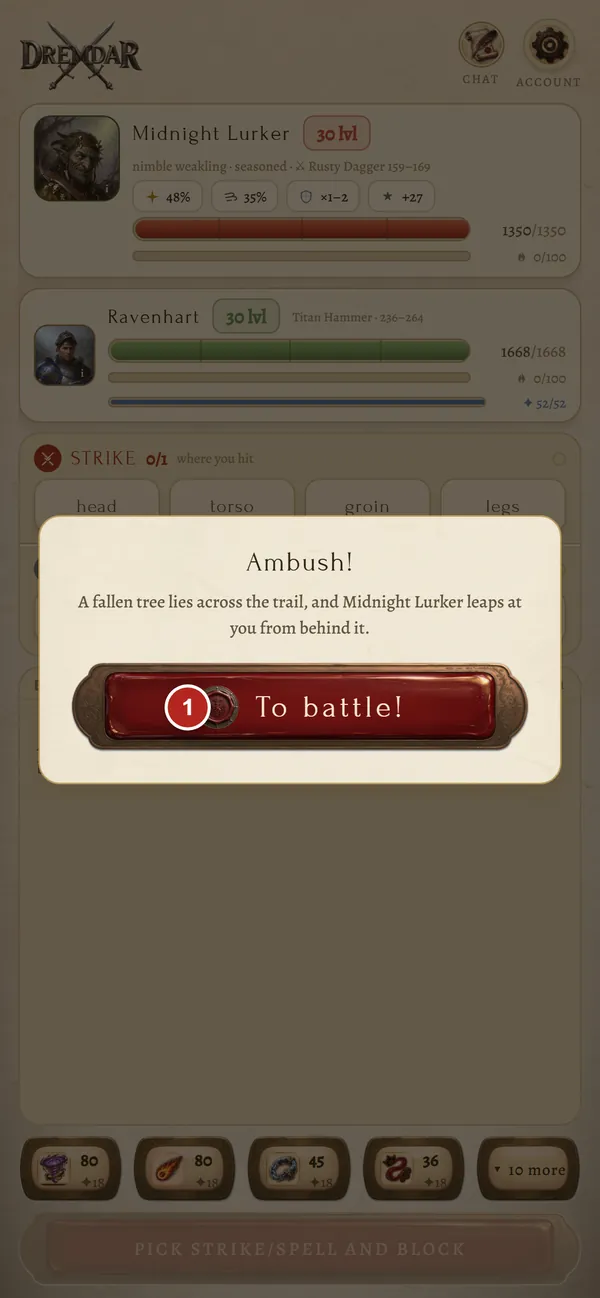
- 1To battle!
World boss
From level 10, a world boss comes to the Wildlands every hour. It has one health bar for the whole server: everyone hits it in their own fight, and the damage goes into a common pot. Died — your contribution is kept; rest and come back. If the boss is finished off, everyone who wounded it gets a reward: XP and coins, plus materials for a notable contribution. One item is rolled among everyone, and the bigger your contribution, the higher your chance. If it isn't finished off in time, the boss leaves, but the most dedicated still get their share.
07Gear
A fighter has ten item slots: weapon, shield, helmet, armor, gloves, belt, boots, amulet and two rings. The shield can be replaced with a mage's focus or a skill tool.
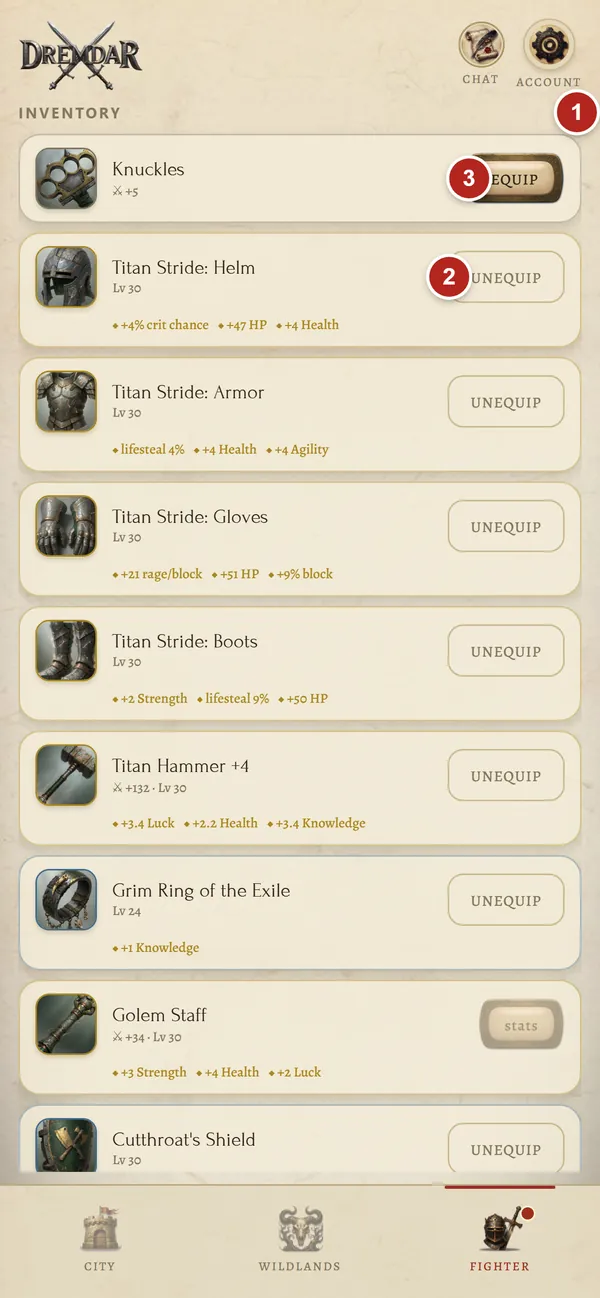
- 1All your items, equipped or not.
- 2“Unequip” — on an equipped item.
- 3“Equip”. If the button is grey, you lack the level or attributes.
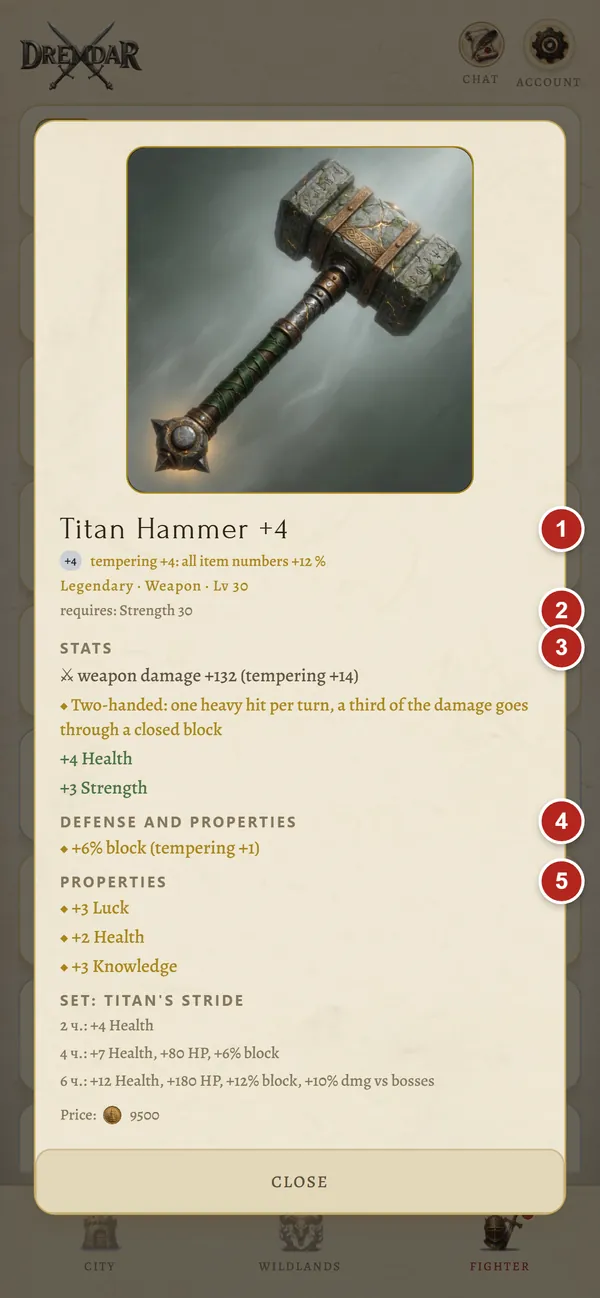
- 1Name and tempering tier.
- 2Attribute requirements. Whatever you're missing is highlighted in red.
- 3Item stats: weapon damage, weapon class, attribute bonuses.
- 4Defense: the item's armor and its permanent properties.
- 5Random properties of this particular item.
Rarity
Common, rare, epic, legendary, artifact. The frame color shows the rarity. The higher it is, the more random properties an item has and the stronger they are. Properties vary: crit chance, dodge, extra health, lifesteal (a strike gives back part of its damage as health), rage per block, damage vs bosses, attribute bonuses. Two identical items can roll completely differently, so hunting for a lucky one is worth it. Magical items can roll spell power instead of crit and lifesteal.
Sets
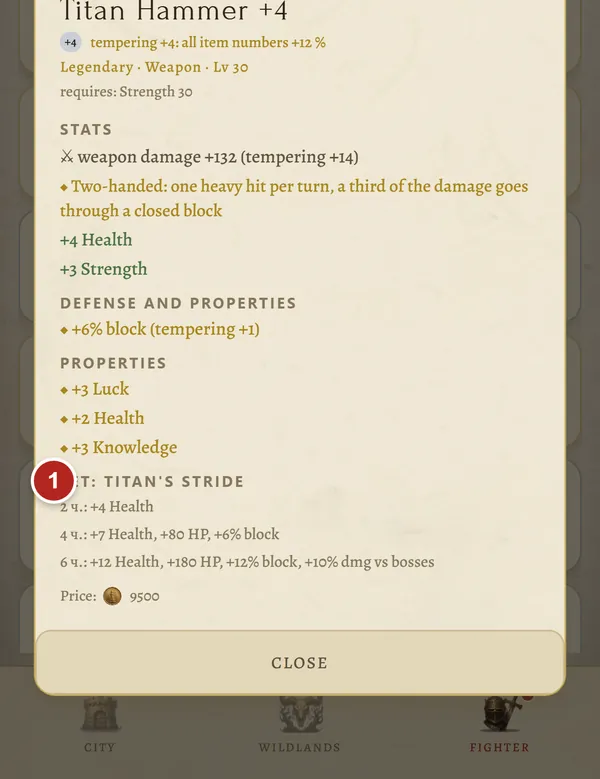
- 1The set and its bonuses for 2, 4 and 6 pieces.
Pieces of the same set give bonuses when you wear several of them. Regular sets are sold in the Shop, while legendary ones drop only from bosses — each boss has its own. A set usually has one more piece than you need for the full bonus, so you can swap one item for something of your own.
Loot, trophies and artifacts
- Beasts sometimes drop items of your level and materials. If you're out of luck for a long time, the chance slowly grows.
- Trophies are special, slightly stronger versions of Shop items. You can't buy them, only win them as loot.
- Every kind of beast has its own rare trophy item. Hunt the one whose trophy you want.
- Artifacts are the best items in the game, sold only for crystals, in sets for fighters and for mages. You can rent an artifact for a while. Artifacts can't be sold or tempered, but you can put them in the clan armory: everyone can wear them, and only you can take them back for good.
08Shop and Market
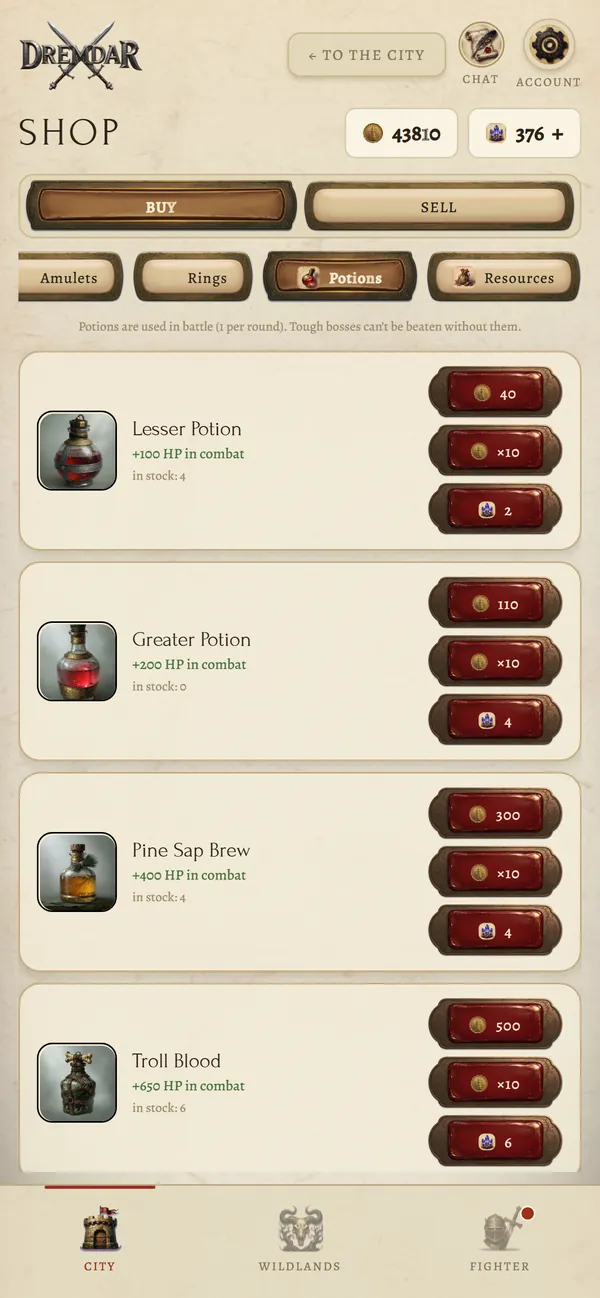
The Shop sells everything you need: weapons and armor by level, potions and scrolls, tools, artifacts. You can also sell what you don't need here. The Shop takes back what you bought from it for half the price, and loot for less. In the “Resources” tab there's the Money changer: he exchanges crystals for coins.
What you'll find among consumables:
- healing potions — drunk in combat; higher levels have their own, stronger ones;
- elixirs — drunk outside combat and last several hours: more damage, armor, dodge, XP or coins. Only two can work at the same time;
- scrolls — combat ones (Stone Skin, Might, Healing) and peacetime ones: Averted Gaze against attacks, Stitched Wounds, Cold Fury for your next fight, Assault on a player;
- special crystal scrolls — Bliss (a bonus to all attributes for several hours), Stone Will (protection from injuries), Fury, Second Chance and the Blood Scroll.
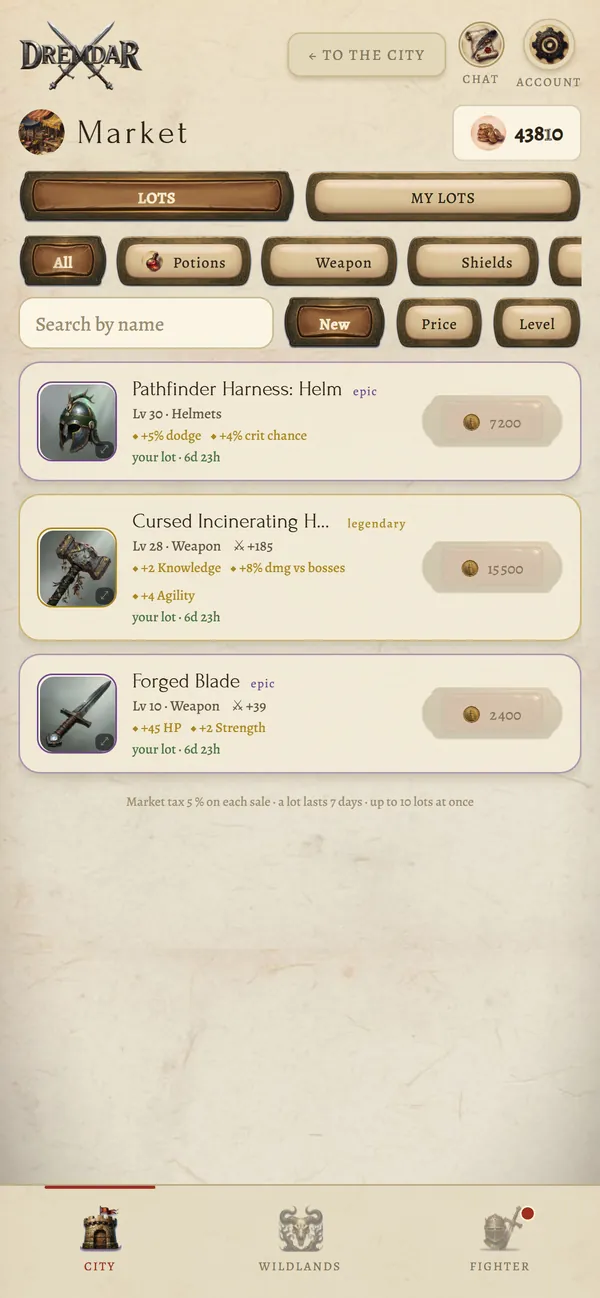
On the Market players sell items to each other for coins, and the seller sets the price. Open an item in your inventory, tap “Sell on market” and name your price. A lot stays up for a week, then the item comes back to you. The market takes a small cut from each sale. You can't trade crystals. While you're at the market, the chat gets its own tab for haggling.
09Forge: tempering, reforging and transfer
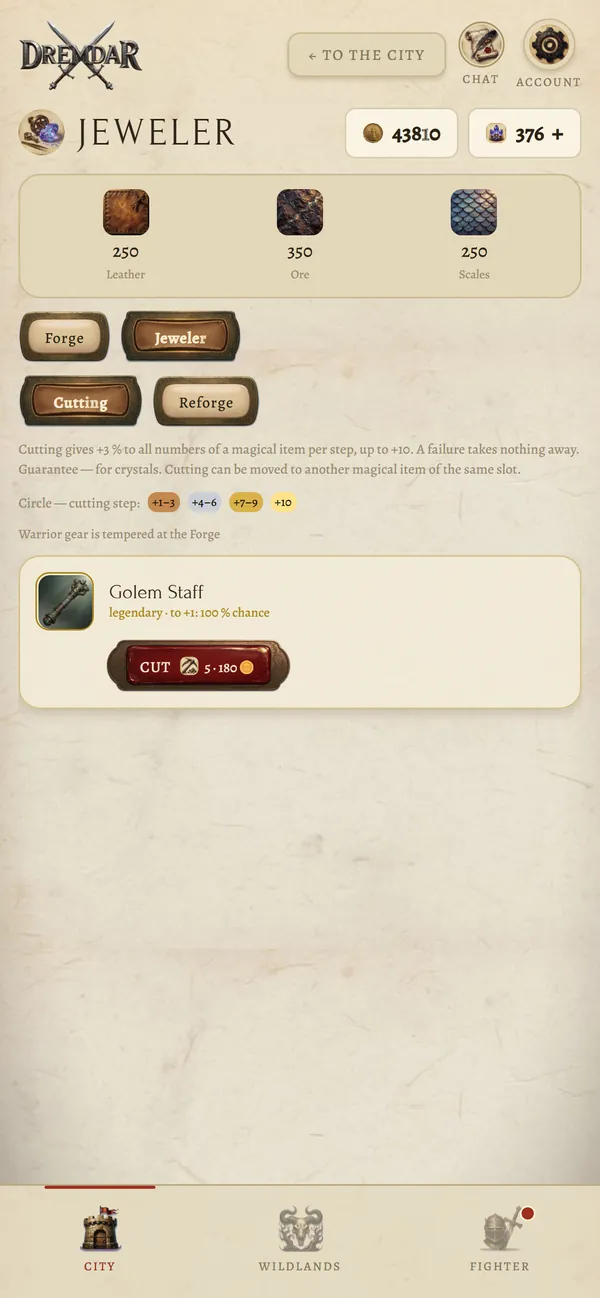
The Forge makes your items stronger. Warrior gear (weapons, armor, fighter's rings and amulets) is tempered at the Forge, while magical items (staves, robes, focuses and mage gear) are cut at the Jeweler. Tempering and cutting follow the same rules.
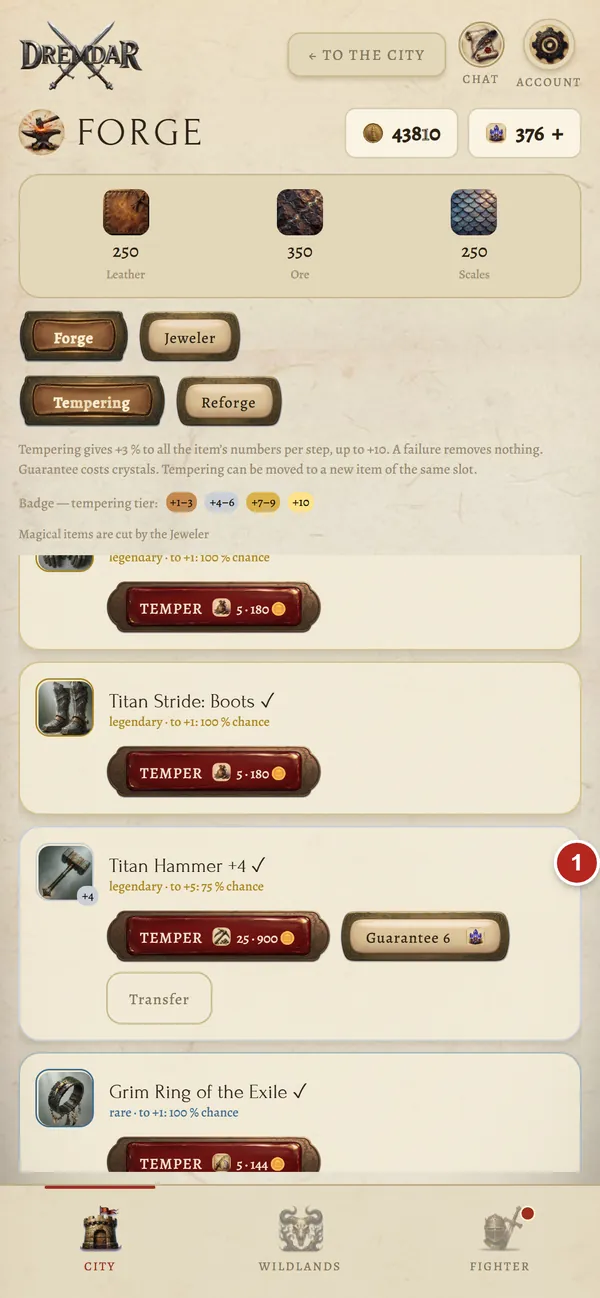
- 1The item, its tier and the chance for the next one. Buttons below: “Temper”, “Guarantee” for crystals and “Transfer”.
Tempering
- An item has ten tempering tiers. Each one makes everything in the item stronger at once: damage, armor, bonuses, properties.
- The fee is materials and coins. Weapons and shields need ore; helmets, armor, gloves, belts and boots need leather; rings and amulets need scales.
- The first three tiers always succeed. After that you can fail, and the higher the tier, the more often. On a failure only the fee burns: the item doesn't break and the tier isn't lost.
- The “Guarantee” button gives you a sure success for crystals.
- The colored circle on an item's picture shows its tier: bronze, silver, gold, radiance.
- Artifacts and rented items can't be tempered.
Transferring tempering
Found a better item? The “Transfer” button moves the tempering from the old item to a new one in the same slot, for example from an old helmet to a new one. It costs some coins, and no materials are needed. Warrior tempering can only go onto a warrior item, cutting — only onto a magical one. So temper boldly: when you switch items, your tempering won't be lost.
Reforging
The “Reforge” tab rerolls an item's random properties for materials, or for crystals if it's an artifact or a prized boss weapon. It comes in handy when the item is good but the properties rolled badly. Common items can't be reforged — they have no properties. The result is random and can't be undone.
10Professions: Forest and River
Professions are peaceful income between fights. In the Forest you hunt and get leather; at the River you fish and get scales. Materials are needed for tempering, reforging and feeding companions, and you can sell the extras in the Shop.
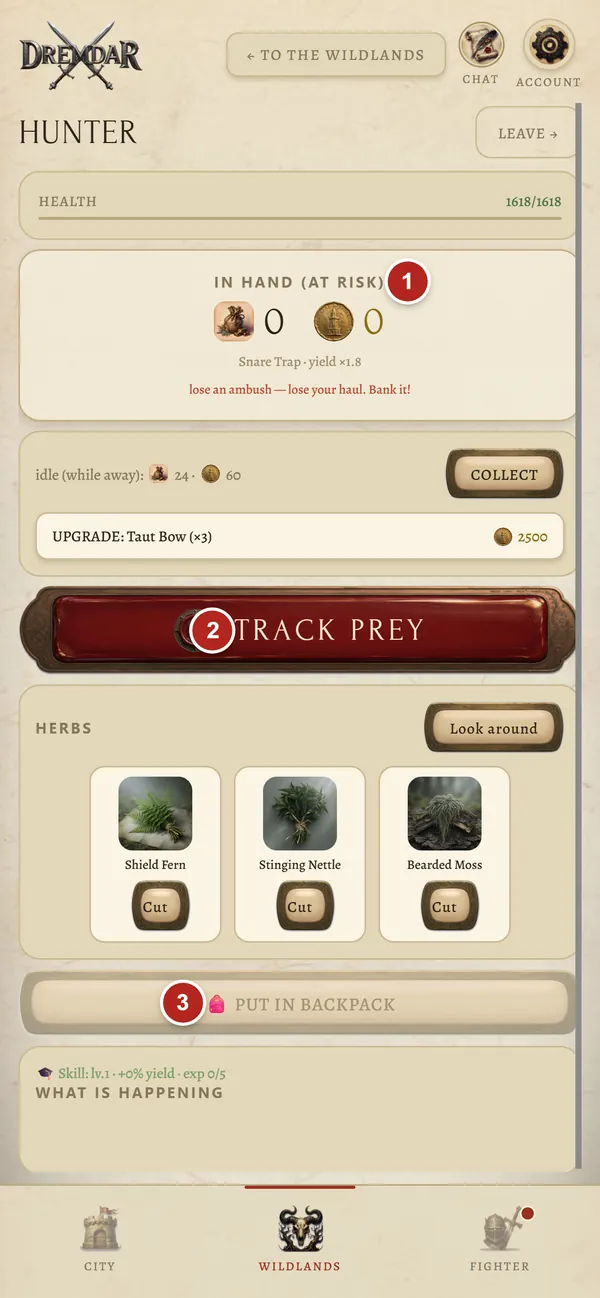
- 1In hand — your haul, still at risk.
- 2Start gathering.
- 3Put your haul into the backpack, where it's safe.
- You can't start without a tool: a hunting knife turns up in the Thicket, and you get a fishing rod for your first hunt. A better tool is bought with the “Upgrade” button right on the profession screen, and the better it is, the bigger your haul.
- Gathering runs on a timer, and the haul piles up in hand. A beast may attack you while you gather. Lose — and you lose everything in your hand. So tap “Put in backpack” in time.
- Each cycle raises your profession skill: the haul gets bigger, and now and then you get a rare catch, three times richer than usual.
- While you're offline, the tool gathers a little on its own. Drop in and tap “Collect”.
The Mine works differently: there the Weaponsmith hews the rock — more on that below.
11Skills: Healer, Alchemist, Weaponsmith
At levels 10, 20 and 30, skill slots unlock (the “Fighter” screen, “Skills” block). Any skill can go into any slot, and by level 30 you can have all three. Your first pick is free; changing costs crystals.
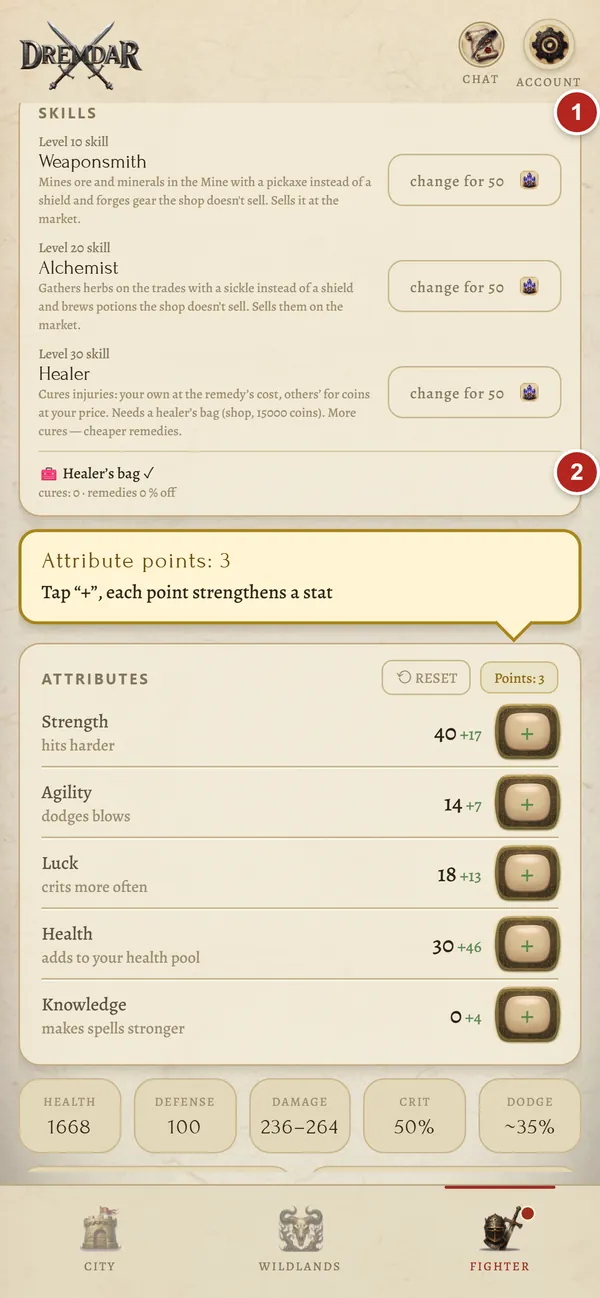
- 1Three skill slots.
- 2Healer's bag: without it a Healer can't heal.
Healer
Cures injuries: your own for the price of a consumable, other players' for coins at the price you set. You buy the Healer's bag on the “Fighter” screen, in the “Skills” block, right under the slots. The consumables (Healer's Bandage, Healer's Remedy and Healer's Elixir) are sold in the Shop, in the “Potions” tab, to Healers only. To cure someone, open their card (tap their nickname in chat) and tap “Cure for coins”. The more you heal, the cheaper your consumables get.
Alchemist
The Alchemist gathers herbs and brews potions you won't find in the Shop.
- Pick the “Alchemist” skill and buy the Alchemist's Sickle in the Shop, in the “Resources” tab. The sickle is worn instead of a shield: it gives no armor and no third block, so be more careful in ambushes.
- Go to a profession — the Forest, the River or the Mine — and tap “Look around”. You'll see the herbs growing there right now. Each land has its own herbs, and once in a while a rare one turns up. Found nothing — look around a bit later.
- Pick a herb and tap “Cut”. Cutting takes a few seconds, and a beast may attack you meanwhile. Lose — and the herb is gone.
- In the Depths herbs sometimes drop from wins too, if you have the sickle equipped.
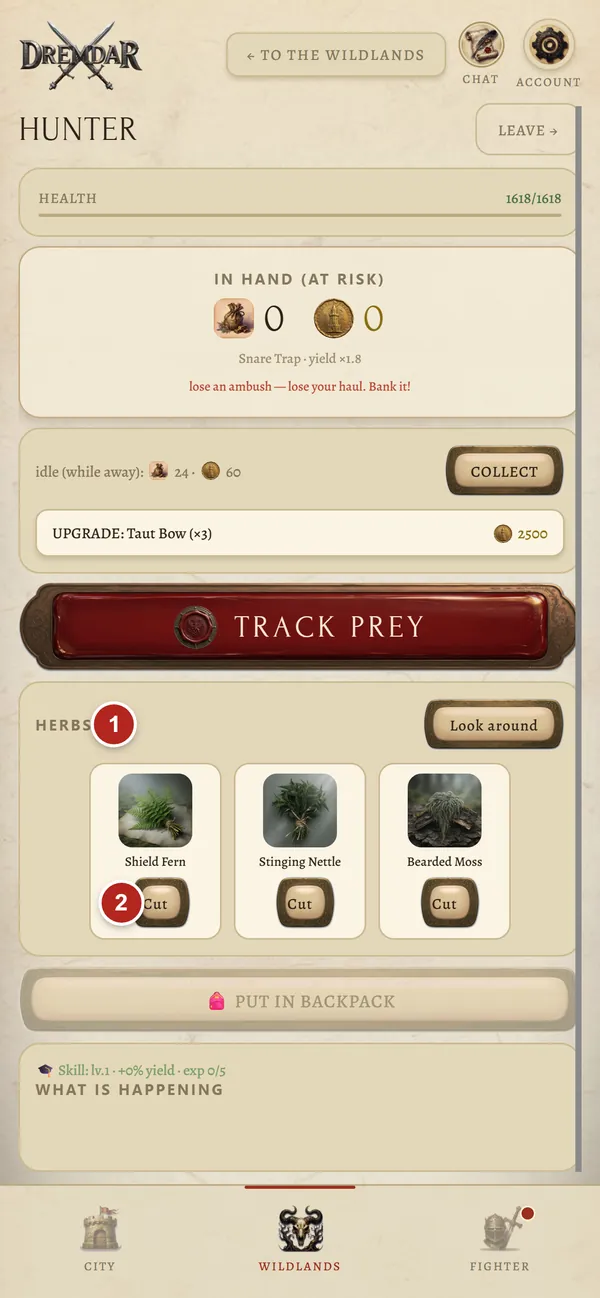
- 1Herbs you've found.
- 2“Cut”.
- Go back to the City and enter Alchemy. Put three different herbs into the cauldron and tap “Brew”. The order doesn't matter, and the same trio always gives the same result. If the trio is a dud, you get Murky Sludge, which the Shop buys.
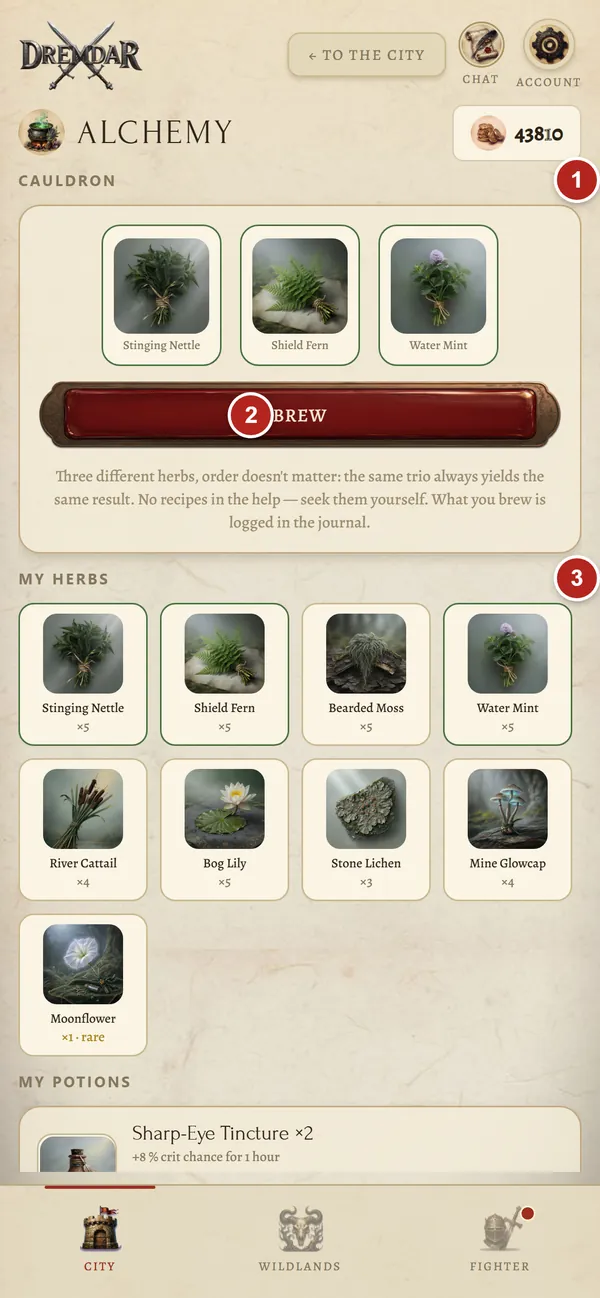
- 1Cauldron: three different herbs.
- 2Brew.
- 3Your herbs.
- There are no recipes in the game guide. Find them yourself: every trio you brew is recorded in the journal, and later you can repeat a good one with a single tap. Some potions need a rare herb.
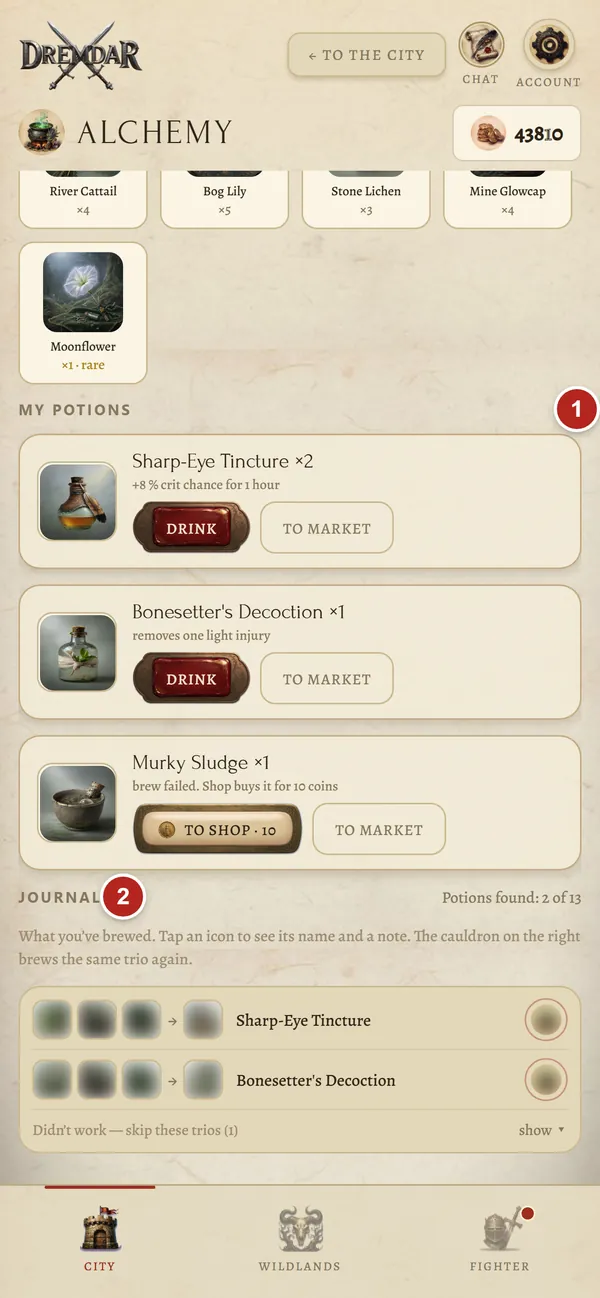
- 1Your potions: drink, sell to the Shop or put up on the market.
- 2Journal: everything you've brewed so far.
Alchemist potions are drunk outside combat and last about an hour: “chug and go”. They give what the Shop doesn't have or sells for more: crit chance, armor, dodge, XP, luck with loot, extra health and mana, blade venom, a second breath after a killing blow, protection from light injuries. There's a brew that clears a light injury, and feed for your companion. Potions take the same two slots as Shop elixirs. You can sell them to other players on the market in batches.
Weaponsmith
The Weaponsmith mines ore in the Mine and forges items you won't find in the Shop.
- Pick the “Weaponsmith” skill and buy the Weaponsmith's Pickaxe in the Shop, in the “Resources” tab. It's also worn instead of a shield.
- Head out to the Wildlands, to the Mine. There are three tiers: the Convict Pits, the Dwarven Mines and the Abyss Pillars. The deeper you go, the richer the rock, but the nastier the ambushes. Anyone can read about a tier, but only a Weaponsmith with a pickaxe can go down and hew.
- Tap “Hew the rock”: you'll see what's in the rock — ore and minerals. Pick one and tap “Mine”. While you're mining, you can be attacked. Along with the Weaponsmith's ore, regular ore for tempering drops too.
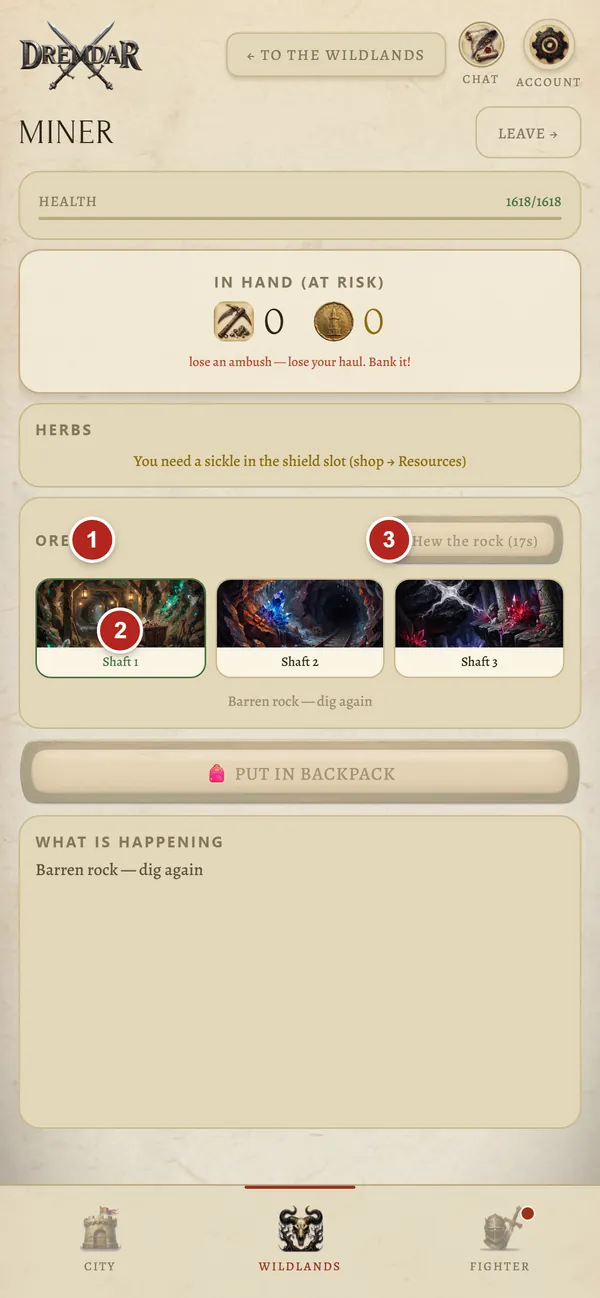
- 1Ore.
- 2Tiers: the deeper, the richer and the more dangerous.
- 3Hew the rock.
- In the City, visit the Weaponsmith. Three parts go on the anvil, and among them there must be both ore and a mineral. You'll get an item or slag.
- There are no recipes in the game guide, but the forge journal remembers everything you've already forged. Forged items are a bit stronger than Shop items of their level; you can't buy them in the Shop or get them from beasts. The Shop buys them for next to nothing, so sell them on the market.
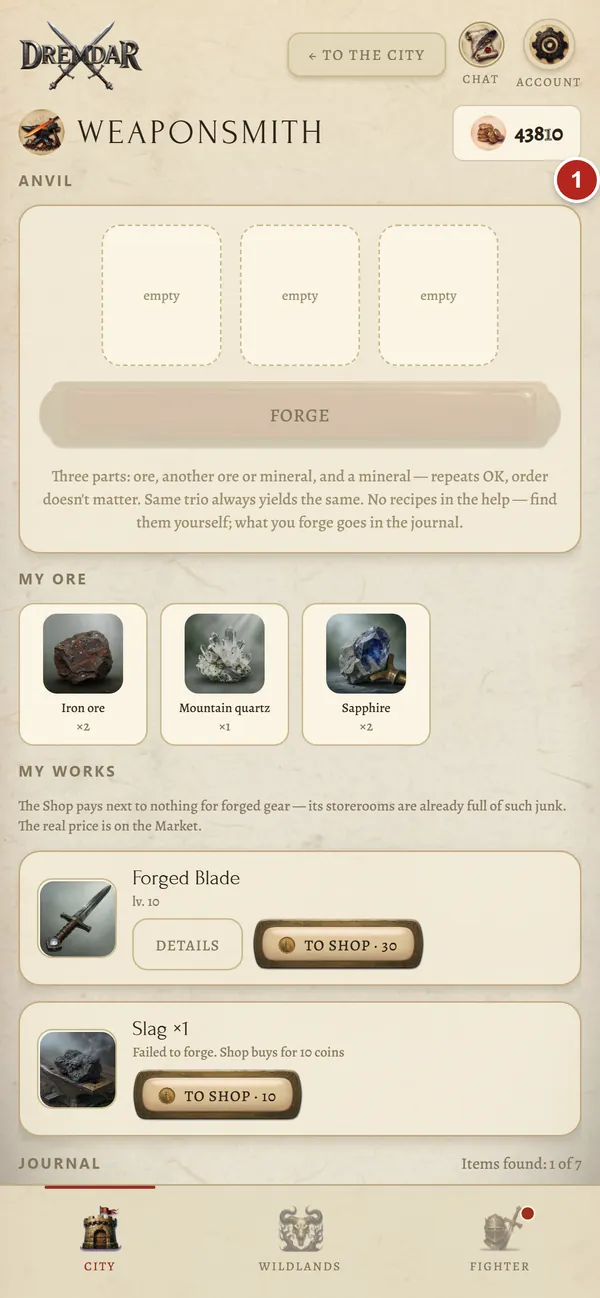
- 1Anvil: three parts.
12Menagerie: companions
From level 20, a companion can travel with you. It always gives a small bonus, for example to coins, XP, dodge or health, and some also help in combat with their own ability. Some companions are sold in the Menagerie, and rare ones drop from bosses. Feed your companion materials and it grows from a cub into a beast, and then into an alpha. Its bonuses grow stronger along the way.
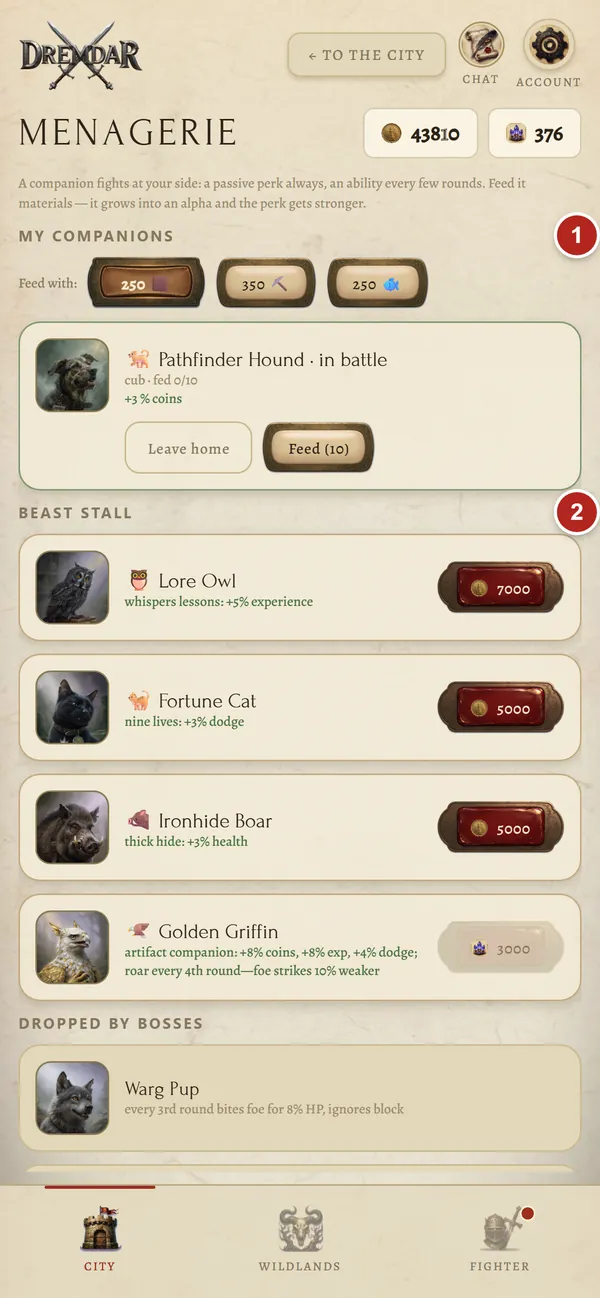
- 1Your companions: feed them, take them to battle or leave them home.
- 2Beast stall.
13Arena and tournament
From level 5 you can fight real people in the Arena. Beating a human gives far more XP than beating a beast.
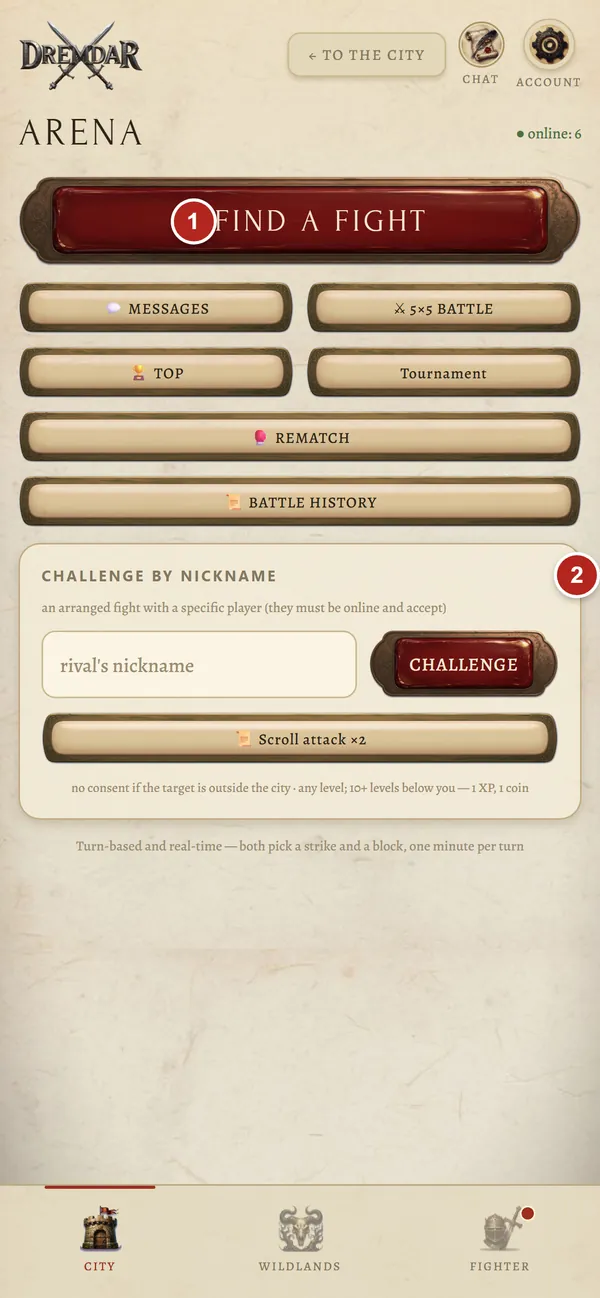
- 1Find a fight: the game finds you an opponent of a similar level.
- 2Challenge by nickname: an arranged fight. Your opponent must be online and accept the challenge.
- A duel follows the same rules as a fight with a beast, but you get one minute per turn. The fight starts with your current health.
- A 5×5 battle is team against team. You pick your opponents yourself, hit any enemy still standing, and the fight goes on until one side falls.
- The Scroll of Assault lets you attack a player who is in the Wildlands right now, without their consent. In the City everyone is safe. You can hit those much weaker than you, but there's nothing in it for you.
- The Blood Scroll is an attack after which the defeated victim gets an injury if you win.
- You can join someone else's fight on either side with a Scroll of Intervention. Ongoing fights are listed in “Battle history”.
- Top shows the best fighters. Rematch lists opponents you've already fought: the game will call you when they log in.
Weekly Tournament
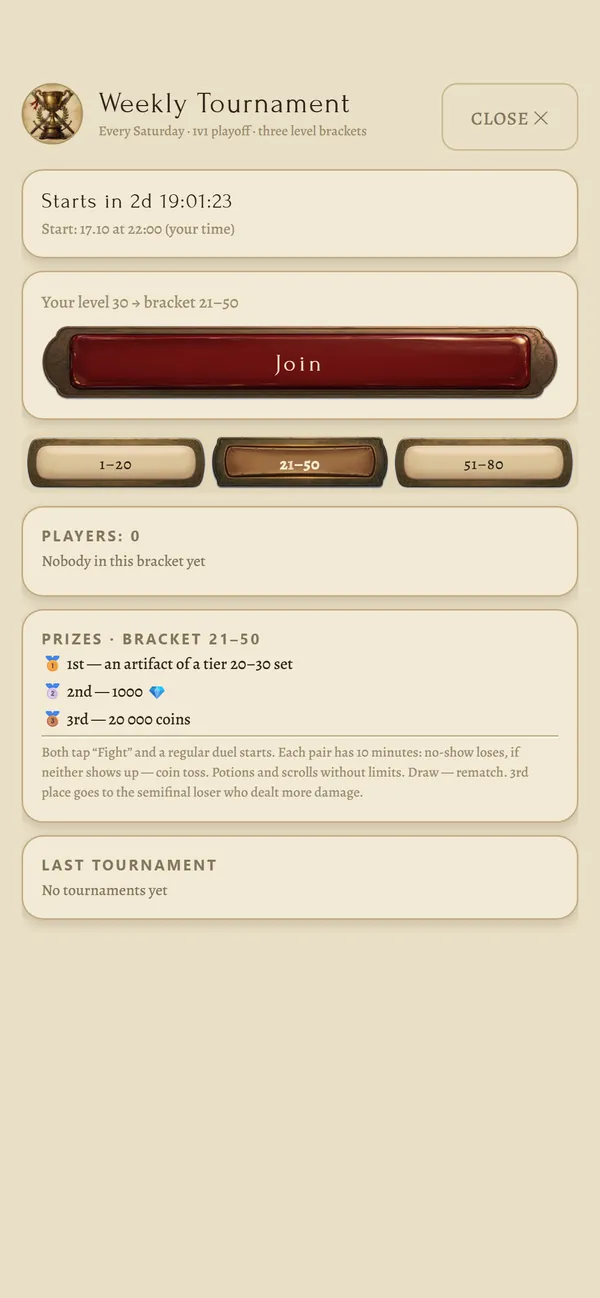
Every Saturday the Arena hosts a knockout tournament. Sign-up is free from Monday until the start. Open the game during the last hour before the start, and in round 1 you’ll get an opponent who’s in the game too. Participants are split into three brackets by level, and in round 1 opponents are close in level. Each pair has 10 minutes to fight: a no-show loses, and if neither shows up, both are out. The winner gets an item from an artifact set, second place gets crystals, third place gets coins, as long as they showed up for their fight. Last week’s tournament, with every pair’s result and fight logs, opens with the “Bracket and fights” button.
14Clan
A clan means your own people, a shared treasury, an item armory, wars and a castle.
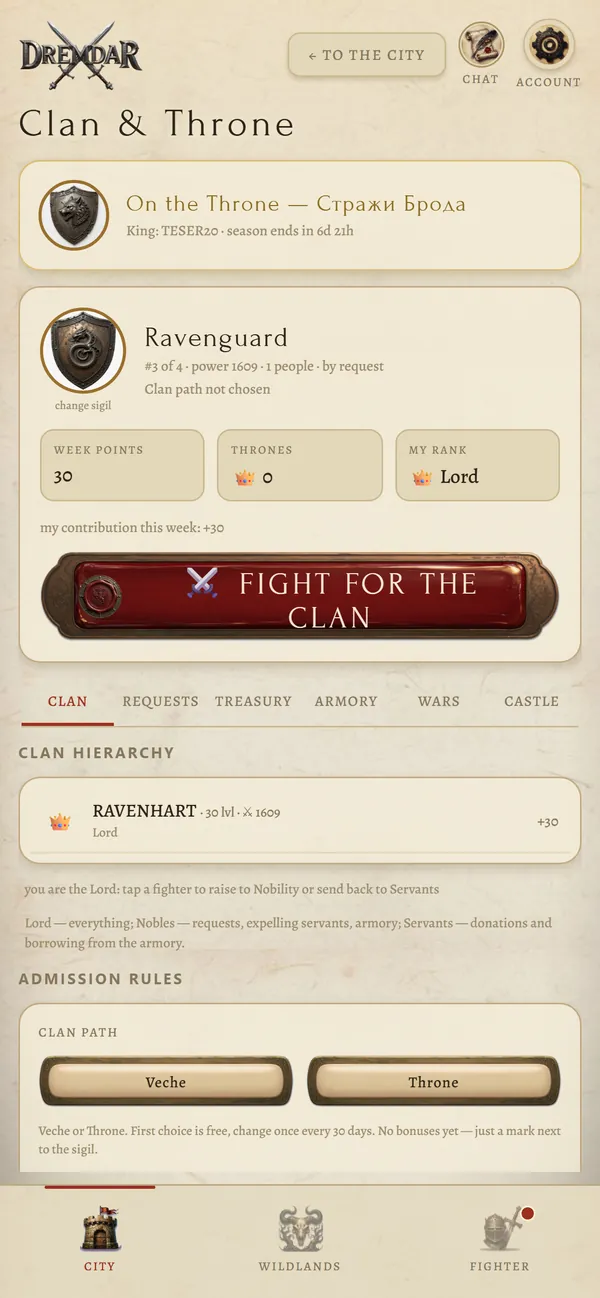
- Join: City → “Clan & Throne” → list of clans. You join an open clan right away; to a closed one you send a request. You can found your own clan from level 15.
- Ranks (bottom to top; each can do everything the ranks below can): the Servants are newcomers — they donate to the treasury and put items in the armory. Retainers also wear items from the armory. Captains accept newcomers, make servants Retainers and expel lower ranks. The Nobility keep armory items for good, declare sieges and expel Captains. The Lord decides everything and hands out ranks.
- Treasury: the clan's coins and crystals. Anyone can donate; the Lord pays out.
- Armory: anyone can put an item there, and any Retainer or higher can wear it. An item from the armory can't be sold or tempered, and if you leave the clan it goes back to the armory. A regular item can be taken for good by the Lord or the Nobility. An artifact stays with whoever put it there: only they can take it back for good, and it leaves the clan with them. Only the Lord or whoever put an item there can take it off its wearer — and never mid-fight. Who took and returned what is shown in the armory log.
- Clan points come from its fighters' victories. The clan with the best result of the week takes the Throne.
- Wars: the Lord challenges another clan and stakes coins from the treasury. The winner takes the stakes.
- Clan chat and a sigil next to your nickname — everywhere people see you.
Castle and sieges
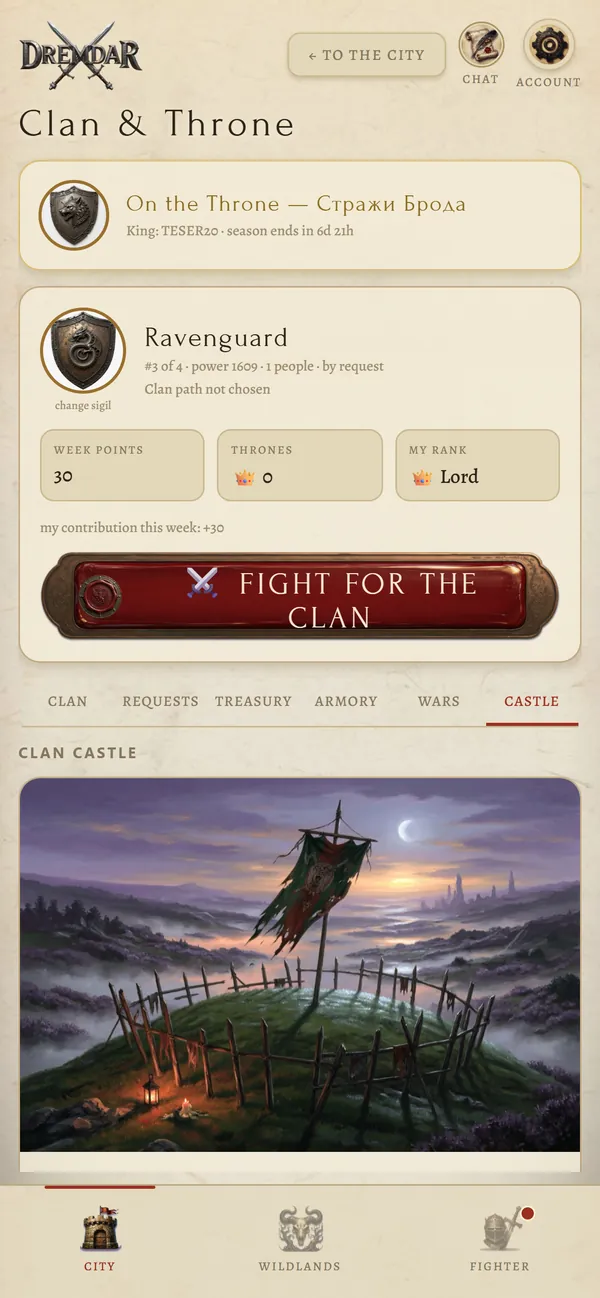
Every clan has a castle. The Lord fortifies it with crystals from the treasury, and its defenders grow stronger. You can besiege someone else's castle: a long side-against-side battle begins in the Arena, and fighters take the walls as they log in. If the castle is taken, the attackers seize part of the treasury. After a siege, the castle can't be besieged again for a while.
The Lord and the crown
The Lord owns the clan: the treasury, roles, wars and the castle are in their hands. While the Lord keeps playing, they can't be voted out. Don't like how they rule? Find another clan or found your own.
- Who can be Lord: a fighter of level 15 or higher who has been in the clan for at least 3 days and has played in the last week.
- Hand over the crown: the Lord can give it to such a fighter — tap the fighter → “Hand over the crown”. The former Lord joins the Nobility.
- The Lord left the clan or deleted their account: the crown passes to the longest-serving noble who can be Lord. If there is none, the clan starts an election on its own.
Lord election
Clan → the “Lord election” panel: whether an election is running, how long until the result, the candidates and the votes.
- When elections happen: the Lord can call one at any time, for example if they no longer want to be Lord. Others can start one only if the Lord hasn't played for a week — and only after 3 days in the clan.
- The Lord is back — an election started without them is cancelled. One the Lord called themselves runs to the end.
- Who votes: everyone with 3+ days in the clan — any rank. One vote each, and you can change it until the result. Pick from the candidate list on the panel.
- You left the clan — your vote and the votes for you are removed. Came back — you can vote again after 3 days.
- The result is checked once a day, at the same hour the election started.
- The election counts if at least half of those who have a vote and played this week have voted.
- The candidate with more than half of the votes cast wins. The former Lord joins the Nobility.
- Too few votes, or nobody has more than half — voting goes on for one more day, three days at most.
- Still undecided after three days — the Lord stays. If there is no Lord, the crown goes to the longest-serving member who can be Lord.
15Quests, crystals and coins
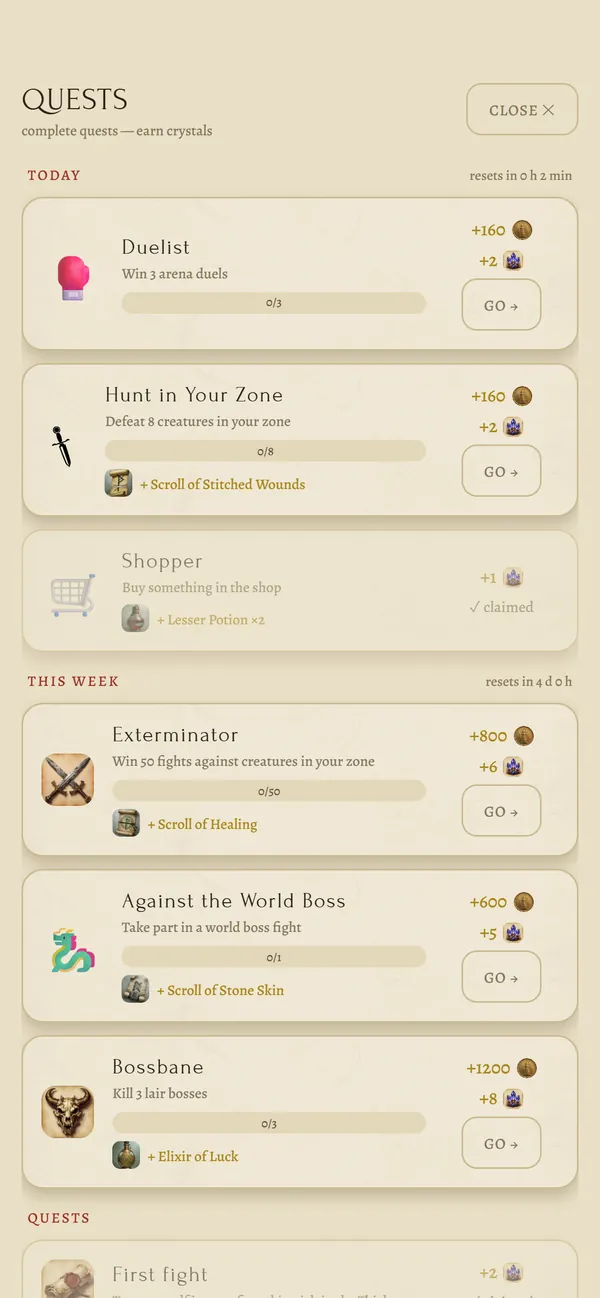
- Daily and weekly quests: three quests every day, three harder ones every week. They reset at midnight UTC. Rewards are crystals, coins, and sometimes scrolls and potions.
- Tutorial quests guide a newcomer through the game and give crystals too.
- Login streak: log in every day, and every third day in a row brings crystals. Miss a day and the count starts over. How many days in a row you have is shown in the City under your nickname.
- Confirm your email in the account menu — you'll get crystals, and you'll be able to recover a forgotten password by email.
- Invite friends: your invite code is your nickname. A friend enters it at sign-up and gets crystals at level 5, and you get yours once they also confirm their email.
- You can also buy crystals: the plus next to crystals in the City.
What crystals are spent on: artifacts and renting them, special scrolls, boss keys, curing injuries, tempering guarantees, changing skills, a clan sigil. Coins go to gear, potions, tempering, tools and everything else.
16Chat
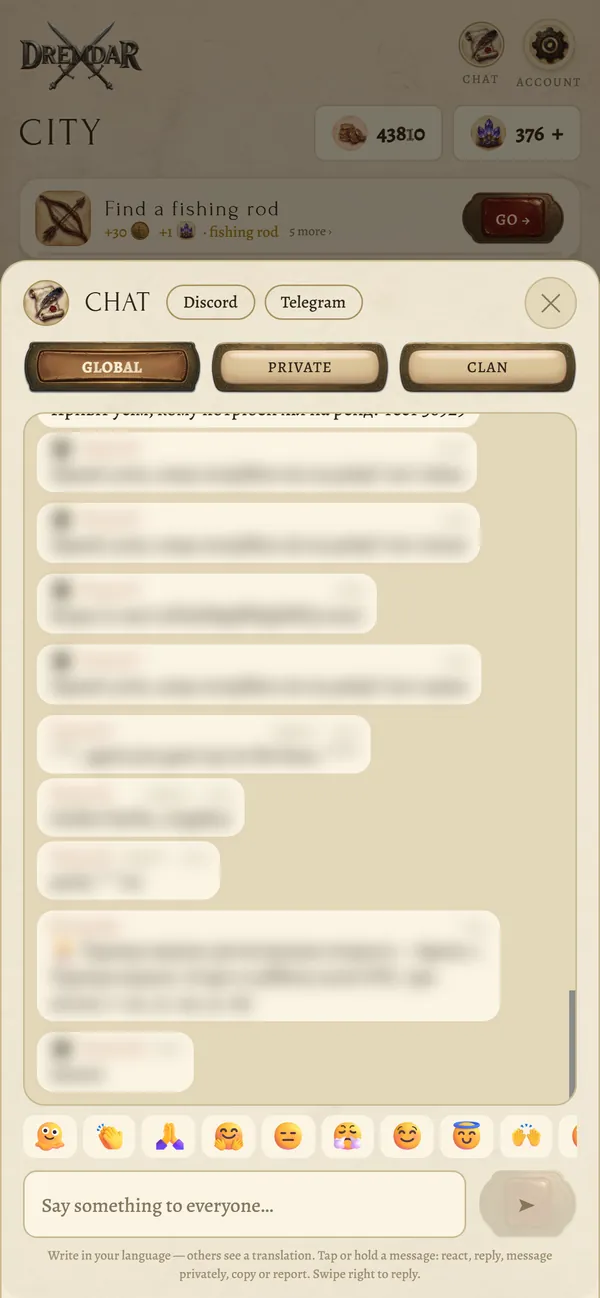
- Tabs: Global for everyone, Private, Clan for your own people. In a duel, in a 5×5 battle and in the world boss fight a Battle tab appears, at the market — a Market tab.
- Write in your own language: others will see a translation, with the original in small print below it.
- Swipe right on a message to reply to that person. Tap or hold a message to bring up reactions, copy, private message and report.
- Tapping a nickname opens the player's card: level, clan, injuries, battle history, and if they're in a fight right now, you can watch it or help.
- The chat is moderated. You can block rude players: you'll stop seeing their messages, and they won't be able to challenge you to a fight.
17Account and settings
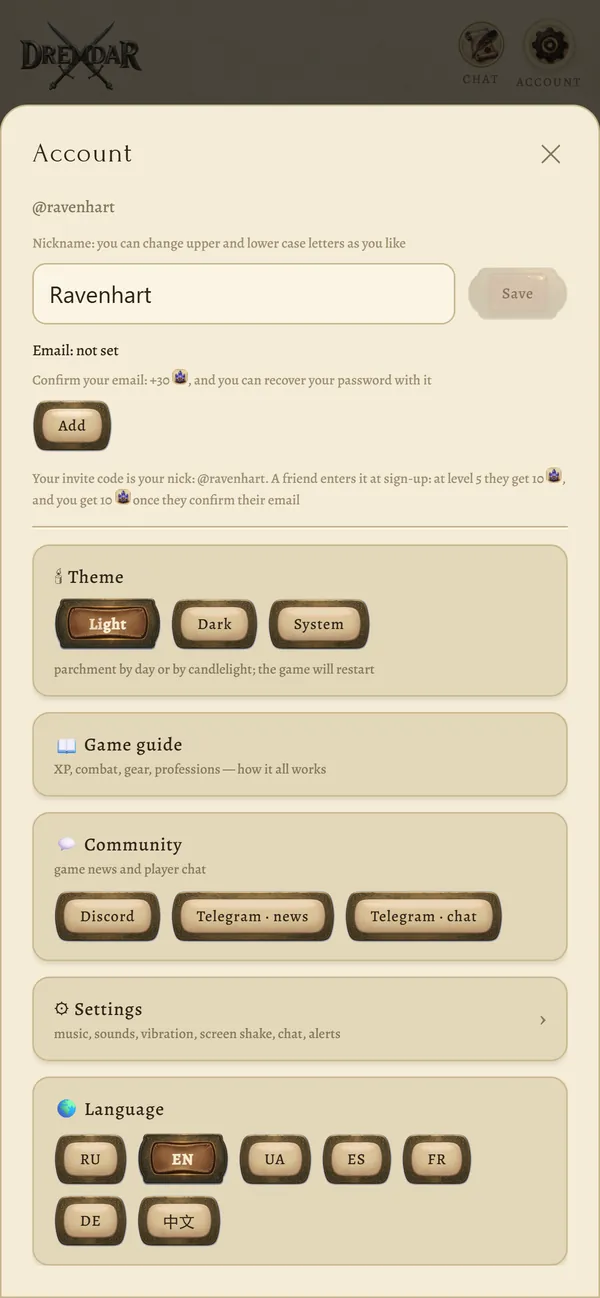
In the account menu:
- Nickname: you can change upper- and lowercase letters.
- Email: add it, confirm it, get crystals for it.
- Theme: light, dark or same as your phone's system. After switching, the game restarts.
- Game guide: short answers to frequent questions.
- Community: our news channel on Telegram, the players' chat and Discord.
- Language: Russian, English, Ukrainian, Spanish, French, German and Chinese. It changes instantly.
- Privacy policy and Terms of service.
- Log out: your progress is stored on the server; log back in and everything returns.
- Delete account: all progress is erased for good.
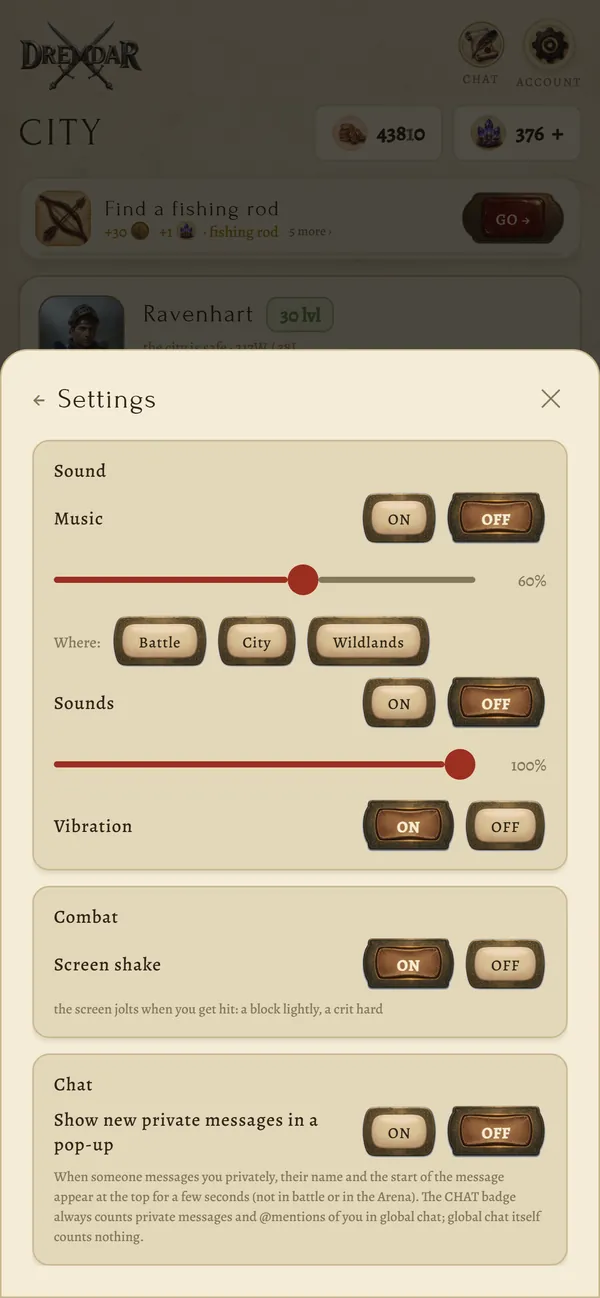
In Settings:
- Music: turn it on or off, set the volume and where it plays — in combat, in the City, in the Wildlands.
- Sounds and their volume.
- Vibration.
- Screen shake in combat: the screen jolts when you're hit, harder on a crit. If it bothers you, turn it off.
- Pop-up private messages: the nickname and the start of the message at the top of the screen for a couple of seconds.
- Notifications (in the phone app): word from Dremdar while you're away, for example about a market sale or the tournament. Each kind can be turned off separately.
Change your avatar with the “Change avatar” button at the bottom of the “Fighter” screen.
18Tips for newcomers
- Spend your points as soon as you level up, and decide what you're betting on: Strength, Agility or Knowledge. Good items have growing requirements, and without your main attribute you won't be able to wear them.
- Hit a beast's weak spot — it's written under its name. Cover the zone it strikes most often.
- Covering one zone builds rage faster. Full rage means a strike more than one and a half times stronger.
- Don't go into a fight wounded. The City heals you for free — you just have to wait.
- Carry healing potions: in combat they don't cost you a turn.
- Knuckles go out of date fast. Check the “Next step” card in the City — it'll suggest a better weapon.
- Put your haul into the backpack before leaving a profession or when your health is low.
- Temper your items boldly: tempering can be transferred to a new item.
- Log in every day: daily quests and your login streak bring crystals.
- Join a clan: they'll help you with advice, items from the armory and in battle.
Still have questions? Short answers are in the guide, game updates are in the news.